


GitLab OAuth2 Account
Overview
Use this account type to connect GitLab Snaps to GitLab.com or to a GitLab Self-Managed instance using the OAuth 2.0 authorization code flow. The Snaps act on behalf of the GitLab user who authorizes the account and send the access token as a bearer token.
GitLab supports only the authorization code grant for this account, so the grant type is
fixed. The account requests the read_api scope by default.
Expression-enabled fields support Secrets Management, a SnapLogic add-on that allows you to store endpoint credentials in a third-party secrets manager such as AWS Secrets Manager, Azure Key Vault, or HashiCorp Vault.
Prerequisites
- An OAuth application registered in GitLab with the
read_apiscope and the SnapLogic redirect URI. See Register an OAuth application in GitLab. - The application ID and secret of the registered application.
- A GitLab user with a role on the projects and groups that allows the reads you intend to run. That user signs in when you authorize the account.
Register an OAuth application in GitLab
Register the application on the same GitLab instance that the Snaps call. An application registered on GitLab.com does not work with a GitLab Self-Managed instance, and the reverse.
- Open the page where you register the application. The owner of the application
determines who can manage it:
- User-owned application: Select your avatar, then .
- Group-owned application: In the group, select .
- Instance-wide application (GitLab Self-Managed administrators only): In the Admin area, select Applications.
- Select Add new application and enter a Name.
- In Redirect URI, enter the SnapLogic OAuth2 callback URL of your
control plane, for example
https://elastic.snaplogic.com/api/1/rest/admin/oauth2callback/gitlab. For the EMEA control plane, useemea.snaplogic.comas the host. - Keep the Confidential checkbox selected.
- Under Scopes, select
read_api. - Select Save application.
- Copy the Application ID and the Secret. GitLab shows the secret only on this page. If you lose it, renew the secret in GitLab.
Enter the application ID in Client ID and the secret in Client secret in the GitLab OAuth2 Account settings, then click Authorize. Learn more: Configure GitLab as an OAuth 2.0 authentication identity provider and OAuth 2.0 identity provider API.
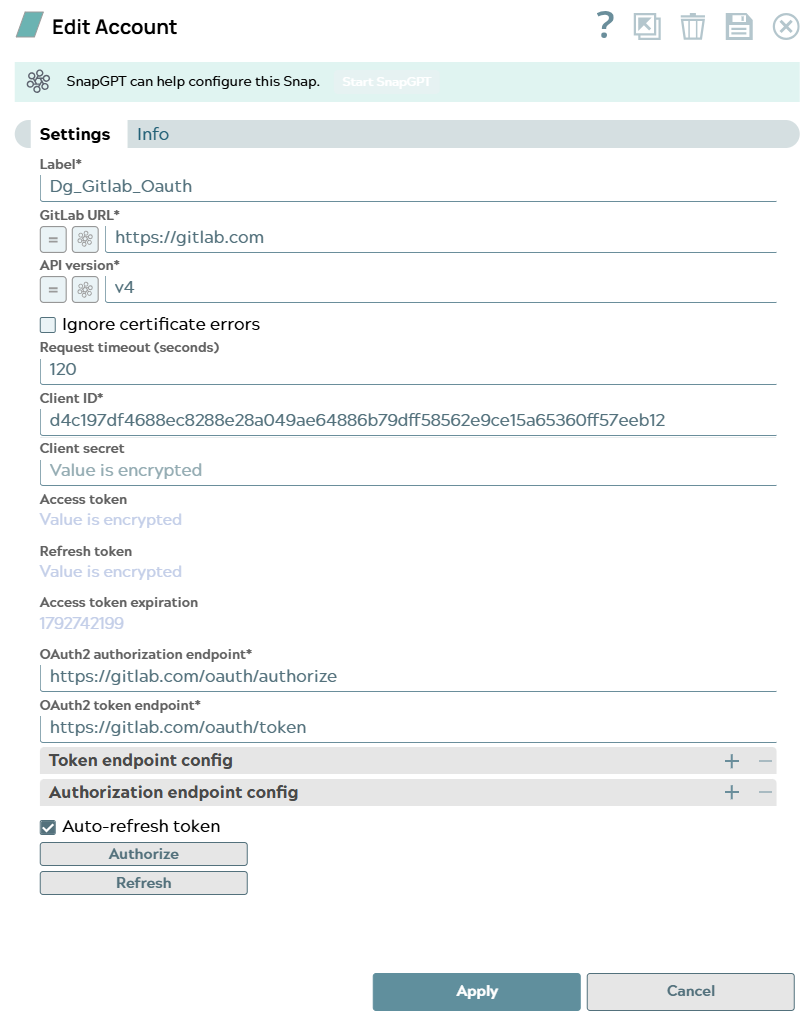
Account settings
| Field/Field set | Description |
|---|---|
| Label*
|
Specify a unique label for the account. Default value: None Example: GitLab OAuth2 Production |
GitLab URL*
String/Expression |
Enter the URL or host name of the GitLab instance that the Snaps call. A host
name without a scheme, such as
You can use a pipeline parameter, such as Default value: https://gitlab.com Example: https://git.example.com |
API version*
String/Expression |
Enter the version of the GitLab REST API that the Snaps call. The version forms
the Default value: v4 Example: v4 |
Ignore certificate errors
Checkbox |
Select this checkbox to skip the validation of the TLS certificate of the GitLab instance when the Snaps call the API. Use it only for a Self-Managed instance with a self-signed certificate in a test environment. For production, import the CA certificate into the trust store of the Snaplex instead. Default value: Deselected Example: Selected |
Request timeout (seconds)
Integer |
Enter, in seconds, the connection and read timeout applied to every request that the Snaps send to GitLab, including the TLS handshake. Raise this value if large repository files, archives, or job artifacts time out. The minimum value is 1. Default value: 60 Example: 300 |
Client ID*
String/Expression |
Enter the Application ID of the OAuth application that you registered in GitLab. Default value: None Example: 9f2c4e1a7b3d... |
Client secret
String/Expression |
Enter the Secret of the OAuth application. This field is obfuscated after saving. Default value: None Example: <Encrypted> |
Access token
String/Expression |
The OAuth2 access token. This field is populated automatically after you click Authorize and is obfuscated after saving. Default value: None Example: <Encrypted> |
Refresh token
String/Expression |
The OAuth2 refresh token used to obtain a new access token when the current one expires. This field is populated automatically after authorization and is obfuscated after saving. Default value: None Example: <Encrypted> |
Access token expiration
Integer |
The expiration time of the current access token. This field is populated automatically after authorization. Default value: None Example: 1767225600 |
OAuth2 authorization endpoint*
String/Expression |
Enter the authorization endpoint of the GitLab instance. For GitLab Self-Managed,
replace Default value: https://gitlab.com/oauth/authorize Example: https://git.example.com/oauth/authorize |
OAuth2 token endpoint*
String/Expression |
Enter the token endpoint of the GitLab instance. The account uses it to exchange
the authorization code for an access token and to refresh the token. For GitLab
Self-Managed, replace Default value: https://gitlab.com/oauth/token Example: https://git.example.com/oauth/token |
| Token endpoint config |
Use this fieldset to specify additional parameters to include in the token endpoint request. Add one row per parameter. |
Authentication parameter
String/Expression |
Enter the name of the parameter. Default value: None Example: scope |
Authentication parameter value
String/Expression |
Enter the value of the parameter. Default value: None Example: read_api |
| Authorization endpoint config |
Use this fieldset to specify additional parameters to include in the authorization endpoint request. Add one row per parameter. |
Authentication parameter
String/Expression |
Enter the name of the parameter. Default value: None Example: scope |
Authentication parameter value
String/Expression |
Enter the value of the parameter. Default value: None Example: read_api |
Auto-refresh token
Checkbox |
Select this checkbox to refresh the access token automatically before it expires, using the refresh token. Select this checkbox for scheduled and long-running pipelines. Default value: Deselected Example: Selected |
Authorize
Button |
Click to start the OAuth2 authorization flow. GitLab asks you to sign in and to authorize the application. SnapLogic then fills in the Access token, Refresh token, and Access token expiration fields. |
Refresh
Button |
Click to refresh the access token manually using the stored refresh token. Available after the account is authorized. |
Click Apply to save the account settings.
Troubleshooting
| Error | Reason | Resolution |
|---|---|---|
| GitLab.com and GitLab Self-Managed | ||
| GitLab reports that the redirect URI is not valid when you click Authorize. | The Redirect URI of the OAuth application in GitLab does not match the SnapLogic callback URL of your control plane. | Edit the application in GitLab and enter the callback URL exactly, for example
https://elastic.snaplogic.com/api/1/rest/admin/oauth2callback/gitlab. |
| GitLab reports that the requested scope is invalid when you click Authorize. | The account requests a scope that the OAuth application does not have. | Select the read_api scope on the application in GitLab, or
request only the scopes that the application grants. |
| Invalid GitLab credentials. | The account has no access token, because it was not authorized or the authorization did not complete. | Click Authorize, complete the sign-in in GitLab, and click Apply. |
| Invalid GitLab URL. | The GitLab URL is not an HTTP or HTTPS URL or host name, or it contains a query string or fragment. | Enter the base URL of the instance, for example
https://gitlab.com. |
| Invalid GitLab API version. | The API version is not of the form
v<number>. |
Enter the REST API version that GitLab exposes, for example v4. |
| Unable to derive the GitLab URL from the token endpoint. | The GitLab URL is empty and the OAuth2 token endpoint is not a valid URL. | Enter the GitLab URL, or a token endpoint such as
https://gitlab.com/oauth/token. |
| A Snap fails with GitLab API request failed
Reason: HTTP 401: 401 Unauthorized |
The access token expired and could not be refreshed, for example because Auto-refresh token is deselected or the refresh token was revoked. The Snaps reload the account once after an HTTP 401 before they fail. | Select Auto-refresh token, then click Authorize again. |
| A Snap fails with GitLab API request failed
Reason: HTTP 403: insufficient_scope |
The access token does not carry the read_api scope. |
Add the read_api scope to the application in GitLab, then authorize the account again. |
| GitLab.com | ||
| A Snap fails with GitLab did not answer the request
Reason: No response from GitLab: ... |
The Snaplex cannot reach GitLab.com: a firewall or proxy blocks the outbound request, or the request times out. | Check the Snaplex proxy settings and allow outbound HTTPS to GitLab.com. Raise Request timeout (seconds) for timeouts. |
| GitLab Self-Managed | ||
| The GitLab.com sign-in page opens when you authorize an account for a Self-Managed instance. | The OAuth2 authorization endpoint and OAuth2 token endpoint still point at GitLab.com. | Point both endpoints at your instance, register the application on that instance, and authorize the account again. |
| A Snap fails with GitLab did not answer the request
Reason: No response from GitLab: ... |
The Snaplex cannot reach the instance: the host name does not resolve, the instance is on a private network, a firewall or proxy blocks the request, or the TLS certificate is not trusted (for example, PKIX path building failed). | Use a Groundplex that can reach the instance, or allow the Snaplex egress IP addresses. Check the Snaplex proxy settings. For an internal or self-signed certificate, import the CA certificate into the Snaplex trust store, or select Ignore certificate errors for testing. Raise Request timeout (seconds) for timeouts. |