


Import and export projects
Export and import complete projects or individual assets in Project Manager to copy them to another environment.
Export produces a ZIP file containing all project assets or selected assets. The export maintains pipeline dependencies, such as child pipelines and related Accounts. You can then import the project in a different project space or a different environment.
Project export and import support a CI/CD workflow across development, testing, and production
environments. If you use the Git Integration for this purpose instead, you can use export and
import to supply Account credentials specific to each environment. An export
produces an accounts_template.json file with Account configuration. You can either
manually change the credential values in the template, or upload a global expression library
that defines variables for Account credentials. Learn more.
Behavior and limitations:
- The maximum number of files you can export at one time is 200.
- The export operation returns an error if the project ZIP file exceeds 100 MB.
- References to assets in the project remain unchanged after import.
- If you import a project with the same name as an existing project, (n) is appended to the project name for each import, starting with n=1.
- The APIM 3.0 Policies asset type is available for export and import only in environments with APIM 3.0 enabled.
Export a project
To export a project:
- Close all pipelines in the project.
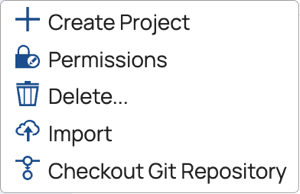
- In the Project Manager navigation pane, hover to highlight the project and click the down
arrow to open the menu:

The project menu opens:

- Select Export. The Export dialog opens:
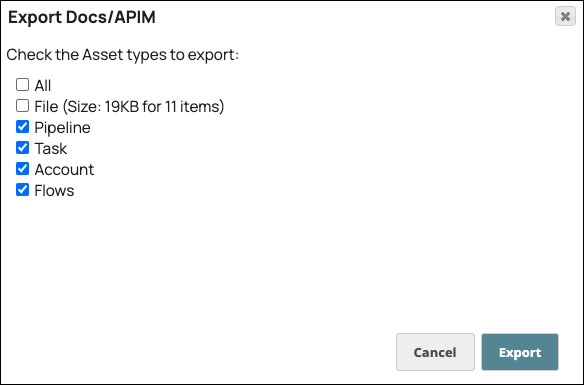
- Select the asset types to export. Pipeline, Task, Account, and APIM 3.0 Policies are selected by default. Select All to include all asset types, or deselect types to exclude them.
- Click Export to download the project as a ZIP file. The ZIP
includes an
accounts_template.jsonfile that lists the Accounts associated with the project.
Import a project
To import a project or individual assets:
- In the navigation pane, hover to highlight the project space (or project) and
click the down arrow to open the menu:
The project space menu opens:
- Select Import to open the Import dialog:
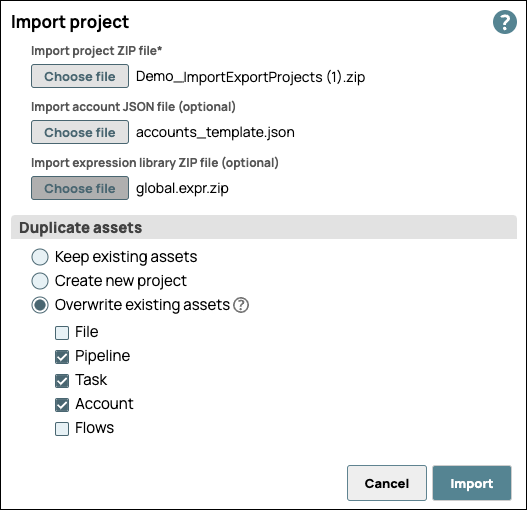
- Click Choose File to upload the project files:
- Import project ZIP file (required)
- Import account JSON file (optional). See Supply Account credentials at import.
- Import expression library ZIP file (optional)
- Select a method for handling duplicate assets in the target Project Space or project:
- Keep existing assets: Skips import of assets that already exist in the target. Each skipped asset is reported as a per-asset failure, and existing assets remain unchanged.
- Create a new project: Creates a new project with
(n)appended to its name and imports all assets with their original names intact. - Overwrite existing assets: If assets with the same name exist in the target, replaces them with the imported version. You can select which asset types to overwrite from the checkbox list.
- Click Import. A confirmation message appears, and the imported project appears in the project list.
After importing, you might need to:
- Add referenced assets that weren't part of the export.
- Edit tasks to select the Snaplex on which they run.
Supply Account credentials at import
The exported accounts_template.json file lists each Account in the
project with its property map. You can modify this file before import to override
Account credentials, which lets you promote projects across environments without
hardcoding credentials. Two methods are available:
substitute
literal values into the file, or
reference
variables defined in an expression library.
- Don't modify the UUID of the Account or the structure of the
property_mapnode. Theproperty_mapstructure might differ for each Account and must be preserved. - If you don't upload this file during import, Accounts are imported without modification.
Supply credentials as literal values
Use this method when a build system supplies credential values, for example from CI/CD pipeline variables. The import re-encrypts each value.
To supply credentials as literal values:
- Extract
accounts_template.jsonfrom the exported ZIP file. - Delete the JSON nodes for Accounts that you don't want to modify.
- Update each
valuekey you want to change with a plain-text replacement. - When importing the project, upload the modified
accounts_template.jsonfile as the Import account JSON file.
Example:
{
  "accounts": {
    "<account-instance-id>": {
      "property_map": {
        "info": {"label": {"value": "new_label"}},
        "settings": {
          "username": {"value": "new_admin"},
          "password": {"value": "new_password_snap1234"}
        }
      }
    }
  }
}
Supply credentials as variables
Use this method when Account credentials should resolve at pipeline runtime against a separately uploaded expression library. Useful when the same project runs in multiple environments and each environment needs different credential values from its own library.
To supply credentials from an expression library:
- Extract
accounts_template.jsonfrom the exported ZIP file. - Delete the JSON nodes for Accounts that you don't want to modify.
- Update each
valuekey you want to change with an expression that references a variable defined in an expression library file (.expr). - When importing the project, upload the modified
accounts_template.jsonfile as the Import account JSON file, and upload a ZIP of .expr files as the Import expression library ZIP file.
Example credential entry that references a library variable:
{
  "accounts": {
    "<account-instance-id>": {
      "property_map": {
        "settings": {
          "password": {"value": "lib.password", "expression": true}
        }
      }
    }
  }
}
Example expression library file that defines the variable:
{ password: 'my-credential-value' }