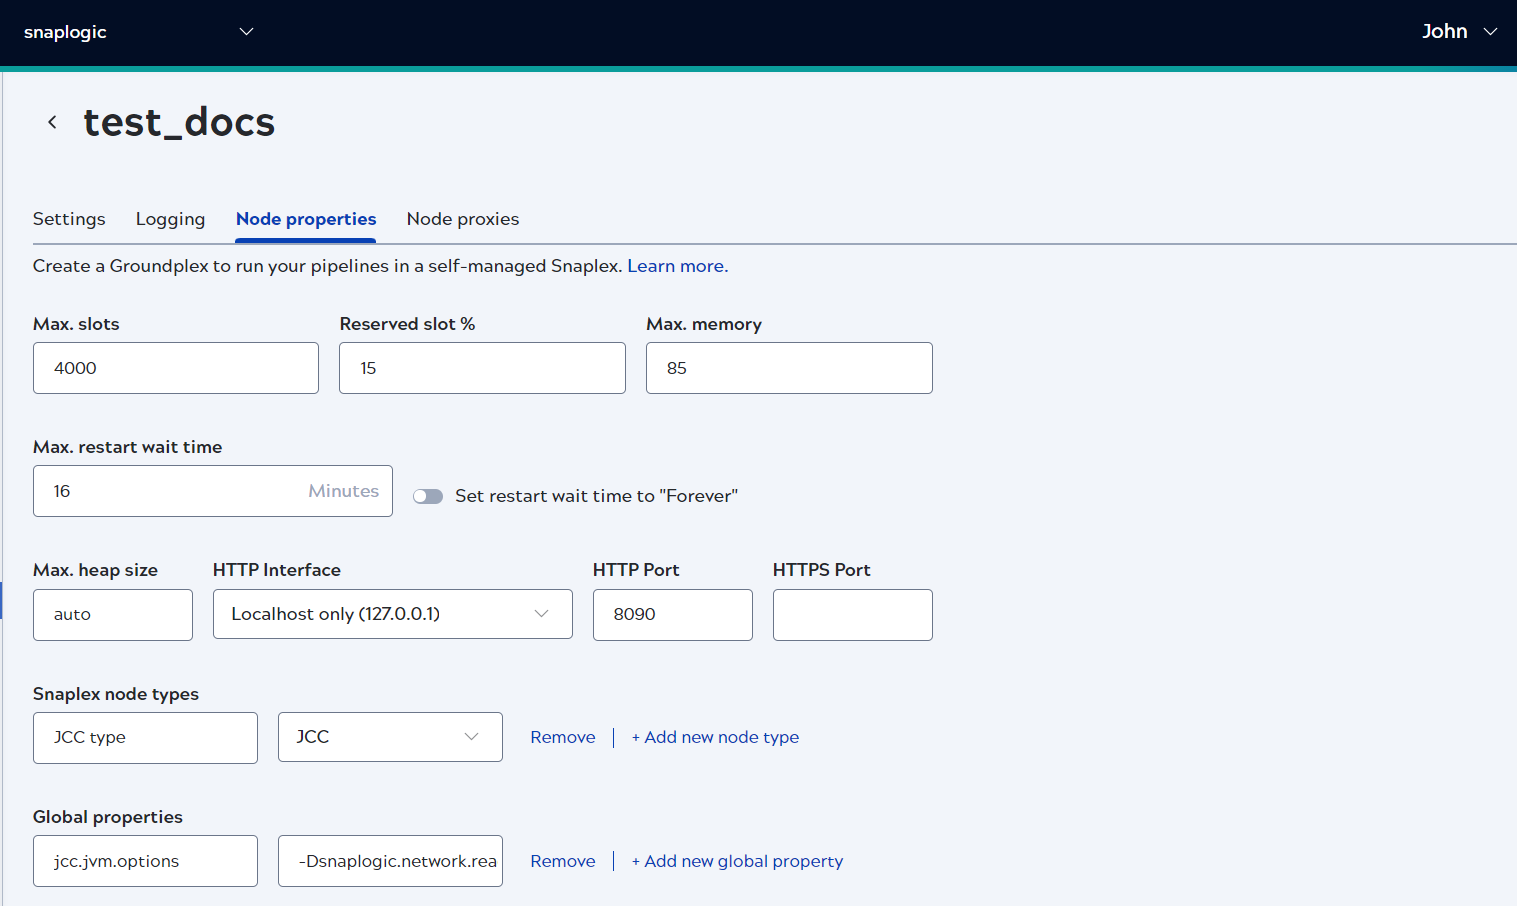
Node property configuration

Node property configuration involves defining various properties and parameters that control the behavior, performance, and functionality of the nodes. Proper configuration of node properties ensures that your nodes operate efficiently, securely, and in line with your organizational requirements.

Node properties can be configured through the SnapLogic Manager or by directly editing configuration files on the nodes. These properties cover a wide range of settings, including memory management, network configurations, logging, and more. Understanding and setting these properties correctly is crucial for the optimal operation of your SnapLogic environment.Node Options

Basic node properties

Basic properties that define the general behavior and characteristics of the nodes are as follows:
  • Node Name
  • Node Type (Groundplex/Snaplex)
  • Environment Variables

Memory and heap space configuration

To change the maximum heap space used by your Snaplex, edit the Maximum Heap Size field setting in the Snaplex dialog.

The default is auto, meaning that SnapLogic automatically sets the maximum heap size based on the available memory. The auto setting uses the optimum fraction of physical memory available to the system and leaves sufficient memory for operating system usage, as follows:

  • For RAM up to 4 GB, 75% is allocated to Java Virtual Machine (JVM).

  • For RAM over 4 GB and up to 8 GB, 80% is allocated to JVM.

  • For RAM over 8 GB and up to 32 GB, 85% is allocated to JVM.

  • For RAM over 32 GB, 90% is allocated to JVM.

Custom heap setting

If you enter your own heap space value, one method is to set the value to approximately 1 GB less than the amount of RAM available on the machine.

Note:

It is recommended that you appropriately set the heap space for optimum Snaplex performance.

  • If the heap space value is excessively high, this can cause the machine to swap memory to disk, degrading performance.

  • If the heap space value is excessively low, this can cause pipelines that require higher memory to fail or degrade in performance.

Compressed class space

In Java, objects are instantiations of classes. Object data is stored on the heap, and class data is stored in nonheap space for memory allocation.

The default compressed class space size is automatically raised to 2 GB to prevent pipeline preparation errors when the JVM heap space size is more than 10 GB.

If a Pipeline Failed to Prepare error displays related to compressed class space, you can customize this setting in the Snaplex Global Properties.

To override the default, add the following global property, where N is the custom size of the compressed class space.

Key Value
jcc.jvm_options -XX:CompressedClassSpaceSize=N
Configure Snaplex memory for dynamic workloads

If your Snaplex workload is unpredictable or you can't plan the memory requirements, the default heap memory settings might not be suitable. Here are some situations where you might need to adjust these settings:

  • The volume of data processed by the pipeline varies significantly.
  • Multiple teams are involved in pipeline development or execution, making capacity planning difficult.
  • Your test or development environment has fewer resources than the production Snaplex.

In these cases, setting the maximum heap size too low can cause memory issues. If your pipelines use more memory than anticipated, the JCC node might reach the maximum memory limit, causing an OutOfMemory exception error and a restart. This results in all currently running pipelines failing.

To prevent this, you can configure the swap memory on the Snaplex nodes. This allows the JCC node to use the configured memory under normal conditions and switch to swap memory if needed, with minimal impact on performance.

For Linux-based Groundplexes, we recommend using the following swap values:
Node Name Node Type Minimum Swap Recommended Swapmaximum (RAM * 0.5,8)
Medium Node 2 vCPU 8 GB memory, 40 GB storage 8 GB 8 GB
Large Node 4 vCPU 16 GB memory, 60 GB storage 8 GB 8 GB
X-Large Node 8 vCPU 32 GB memory, 300 GB storage 8 GB 16 GB
2X-Large Node 16 vCPU 64 GB memory, 400 GB storage 8 GB 32 GB
Medium M.O. Node 2 vCPU 16 GB memory, 40 GB storage 8 GB 8GB
Large M.O. Node 4 vCPU 32 GB memory, 60 GB storage 8 GB 16 GB
X-Large M.O. Node 8 vCPU 64 GB memory, 300 GB storage 8 GB 32 GB
2X-Large M.O. Node 16 vCPU 128 GB memory, 400 GB storage 8 GB 64 GB
Performance considerations

When enabling swap space, it's important to ensure the volume's IO performance is high to maintain acceptable overall performance.

Recommendations for AWS
Use Instance Store instead of EBS volume to mount the swap data. For more details, refer to the Instance Store swap volumes documentation.
Implications of swap usage
If your workload exceeds the physical memory and begins to use swap, the JCC node can slow down due to the additional IO overhead. To mitigate this, configure higher timeouts for jcc.status_timeout_seconds and jcc.jcc_poll_timeout_seconds for health checks.
Resource exhaustion
Even with swap configured, if all available memory is used up, the JCC process may still run out of resources. This can cause the JCC process to restart, terminating all running pipelines. To prevent this, use larger nodes with more memory to ensure your workload can complete successfully.
Swap configuration
Limit the swap size to the maximum that the JCC node will use. Setting a larger swap size can degrade performance, particularly during Java Runtime Environment (JRE) garbage collection operations.
Best practices
  • Memory swapping can result in performance degradation because of disk IO, especially if the Pipeline workload also utilizes local disk IO.

  • When the pipeline workload is dynamic and capacity planning is difficult, we strongly recommend the minimum swap configuration.

Swap memory configuration workflow

To utilize swap for the JCC process, you can use this workflow:

  1. Enable swap on your host machine. The steps depend on your operating system (OS). For example, for Ubuntu Linux, you can use the steps in this tutorial.

  2. Update your Maximum memory Snaplex setting to a lower percentage value, such that the absolute value is lower than the available memory. The load balancer uses this value when allocating Pipelines. The default is to set to 85%, which means that if the node memory usage is above 85% of the maximum heap size, then additional pipelines cannot start on the node.

  3. Add the following two properties in the Global properties section of the Node Properties tab in the Update Snaplex dialog:

    • jcc_poll_timeout_seconds is the timeout (default value is 10 seconds) for each health check poll request from the Monitor.

    • status_timeout_seconds is the time period (default value is 300 seconds) that the Monitor process waits for before the JCC is restarted if the health check requests continuously fail.

Key Value
jcc.jcc_poll_timeout_seconds 60
jcc.status_timeout_seconds 3600
Ring buffer

The size of the buffer between Snaps is configured by setting the feature flags on the org com.snaplogic.cc.jstream.view.publisher.AbstractPublisher.DOC_RING_BUFFER_SIZE, where the default value is 1024 and com.snaplogic.cc.jstream.view.publisher.AbstractPublisher.BINARY_RING_BUFFER_SIZE, where the default value is 128.

com.snaplogic.cc.jstream.view.publisher.AbstractPublisher.DOC_RING_BUFFER_SIZE=1024
         com.snaplogic.cc.jstream.view.publisher.AbstractPublisher.BINARY_RING_BUFFER_SIZE=128
Clearing node cache files

A clearcache option is added to the jcc.sh/jcc.bat file to clear the cache files from the node.

Note:

You must ensure that the JCC is stopped before running the clearcache command on both Windows and Linux systems.

Customize version updates

The Snaplex process automatically updates itself to run the same version as running on the SnapLogic cloud. If there is a mismatch in the versions, the Snaplex cannot be used to run pipelines.

When the Snaplex service is started, two Java processes are started. First is the Monitor process, which then starts the actual Snaplex process. The monitor keeps track of the Snaplex process state, restarting it in case of failure. The Snaplex by default upgrades itself to run the same binaries that are running on the SnapLogic cloud. The monitor process continues running always, running from the binary which was used when the Monitor was originally started. Running jcc.sh restart or jcc.bat restart restarts both the monitor and the Snaplex processes.

In case a custom Snaplex patch is provided for a customer, it is provided as a jcc.war file. If this is copied into the /opt/snaplogic/run/lib directory and the JCC node is restarted, the JCC again downloads the latest version of the war file. To prevent the Snaplex from going back to the default binaries, you can setup the Snaplex to disable downloading the current version from the SnapLogic cloud. To do this, check the value of build_tag as returned by https://elastic.snaplogic.com/status. For example, if the build tag is mrc27, adding the following line in etc/global.properties prevents the Snaplex from downloading the mrc27 version from the cloud.

jcc.skip_version = mrc27

When the next release is available on the cloud and the custom patch is no longer required, the Snaplex automatically downloads the next version.

The download of latest binaries and automatic updates can be disabled on the Snaplex. If so, the next time there is a new version available on the SnapLogic cloud, the Snaplex is no longer be usable since there would be a version mismatch. The automatic download would have to be re-enabled for the Snaplex to be usable again.

To avoid such issues, the skip_version approach above is the recommended method to run with a custom version of the Snaplex binaries.

To prevent the new binaries from being downloaded, set (default is True):

jcc.enable_auto_download = False

To disable the automatic restart of the Snaplex after new binaries are downloaded, set (default is True):

jcc.auto_restart = False

JCC node debug mode

If you are using the Snaplex for Snap development and it needs to be put in debug mode, you can configure the monitor process to start the JVM with debug options enabled. Add the following line in etc/global.properties

jcc.jvm_options =
      -agentlib:jdwp=transport=dt_socket,server=y,suspend=n,address=8000

This starts the Snaplex process with the debug port set to 8000. Otherwise, any Pipeline executions sent to the Snaplex would hit breakpoints set in the Snap code.

Configure Bouncy Castle as the first security provider in your Snaplex

The JCC node contains a list of security providers to enable Snaps to work with SSL or private keys. SUN is the default and the main security provider. However, the SUN provider might not handle some private keys, resulting in an InvalidAlgorithmException error. In such cases, you must ensure that the Bouncy Castle security provider is used as the main security provider; otherwise, the pipelines fail.

You can enable a flag in the node properties to make Bouncy Castle the first security provider.

  1. In the Node Properties tab of your target Snaplex, add the following key/value pair under Global Properties:

    • Key: jcc.jvm_options

    • Value: -Dsnaplogic.security.provider=BC

  2. Click Update, and then restart the Snaplex node.

    Update Snaplex-Value