


Anaplan Account
Overview
You can use this account type to connect Anaplan Snaps with data sources that use the Anaplan Account.
Prerequisites
A valid account with the required permissions.
Limitations and known issues
None.
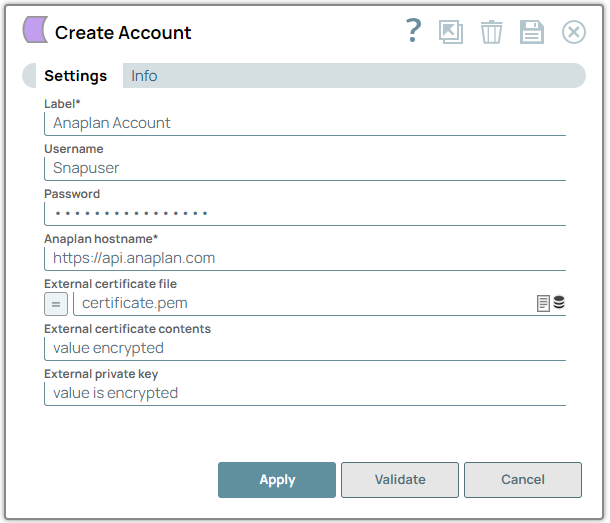
Account settings
Legend:
- Expression icon (
 ): Allows using
JavaScript syntax to access SnapLogic Expressions to set field values dynamically (if
enabled). If disabled, you can provide a static value. Learn more.
): Allows using
JavaScript syntax to access SnapLogic Expressions to set field values dynamically (if
enabled). If disabled, you can provide a static value. Learn more. - SnapGPT (
 ): Generates SnapLogic Expressions
based on natural language using SnapGPT. Learn
more.
): Generates SnapLogic Expressions
based on natural language using SnapGPT. Learn
more. - Suggestion icon (
 ): Populates a
list of values dynamically based on your Snap configuration. You can select only one
attribute at a time using the icon. Type into the field if it supports a comma-separated
list of values.
): Populates a
list of values dynamically based on your Snap configuration. You can select only one
attribute at a time using the icon. Type into the field if it supports a comma-separated
list of values. - Upload
 : Uploads files. Learn more.
| Field/Field set | Type | Description |
|---|---|---|
| Label | String |
Required.
Specify a unique label for the account.
Default value: N/A Example: Anaplan Account |
| Username | String |
Specify the name for this account. Default value: N/A Example: Snapuser |
| Password | String |
Specify the password for this account. Default value: N/A Example: nb*#!@09 |
| Anaplan hostname | String |
Required.
Specify the hostname for Anaplan REST API service.
Default value: https://api.anaplan.com Example: https://api.anaplan.com |
| External certificate file | String/Expression |
Specify the link of the certificate file that you have uploaded.
You can use a certificate file instead of a username/password to simplify login.
Click the database icon to select the file and upload it into SnapLogic.
Note:
Specifying External certificate contents is more secure than specifying the External certificate file because the certificate content is encrypted; whereas an uploaded certificate file is not encrypted.
Default value: N/A Example: certificate.pem |
| External certificate contents | String |
Specify the contents of your certificate file.
The certificate typically has the following format:
Note:
Specifying External certificate contents is more secure than specifying the External certificate file because the certificate content is encrypted; whereas an uploaded certificate file is not encrypted.
Default value: N/A Example: |
| External private key | String |
Specify the plain-text version of your private key.
Note:
If you have an encrypted private key, you must decrypt it using OpenSSL and the passphrase that was used for encryption.
Perform the following steps in a terminal window to get the plain-text version of your private key:
Default value: N/A Example: |
Troubleshooting
If a validation error occurs after you enter the certificate and private key in Accounts, verify the following:-
Check the certificate format.
It must be in plain text and start with
-----BEGIN CERTIFICATE-----and end with-----END CERTIFICATE-----. -
Check the private key format.
It must be in plain text and start with
-----BEGIN RSA PRIVATE KEY-----and end with-----END RSA PRIVATE KEY-----.