


Configure the Git Integration to use GitLab on-premises (Beta)
Configure the Git integration for self-managed GitLab.
The Git Integration has beta support for a self-managed GitLab installation deployed on-premises or in the cloud. The SnapLogic Platform supports a single Groundplex per environment for Git operations. SnapLogic provides an App Gateway, a secure transparent proxy, to route Git requests through your Groundplex to the GitLab server, providing an additional layer of security.
To enable use of self-managed GitLab for tracking SnapLogic assets, you need the following:
- A subscription for the SnapLogic Git Integration
- Administrative permission for the GitLab group
- SnapLogic Environment (Org) admin permission
Repository visibility
We recommend that you configure the Git Integration to only access repositories dedicated to SnapLogic assets. This improves the performance of authorization and Git operations in the SnapLogic Platform. It also improves usability by reducing the list of repositories that pipeline developers must choose from during checkout.
- comma-separated list
- group_name/* means all the repositories right under the root, not in subgroups.
- group_name/** means the whole tree
- group_name/subgroup_1/*, group_name/subgroup_1/subgroup_2/* or _name/subgroup_1/subgroup_2/…/subgroup_n/* means all the repositories under the subgroup_1, subgroup_2 or subgroup_n.
- group_name/subgroup_1/**, group_name/subgroup_1/subgroup_2/**, group_name/subgroup_1/subgroup_2/…/subgroup_n/** means all the repositories under the subgroup_1, subgroup_2, or subgroup_n and their descendants subgroups. Here, the first case covers all the others.
- group_name/repositorya, group_name/subgroup_1/repositoryb, group_name/subgroup_1/repositoryc, group_name/subgroup_1/subgroup_2/repositoryd or group_name/subgroup_1/subgroup_2/…/subgroup_n/repositorye means the specific repositories listed: repositorya, repositoryb, repositoryc, repositoryd, and repositorye.
Create an application in GitLab
To enable GitLab to track SnapLogic assets, create an application that configures connectivity:
- Log in to GitLab.
- Navigate to your Group.
- Select Settings.
- Click Applications.
- Click Add a new application.
- Enter a name.
- Specify these values:
- For Redirect URI, enter:
https://control-plane-name.snaplogic.com/api/1/rest/asset/app/oauthcallbackWhere
control-plane-nameis the control plane you are using. For example:- elastic
- uat
- emea
Important: This Redirect URI is the same as the Callback URL that you specify to configure the Git Integration in your SnapLogic environment. - Leave the Confidential box checked.
- For Scopes select the following:
- api
- read_api
- read_user
- write_repository
- Click Save application.
- Click the application to view it and copy the secret to use when configuring the SnapLogic environment.
- For Redirect URI, enter:
Configure the SnapLogic environment
To complete the configuration, the SnapLogic Environment Admin can configure Git Integration settings in Admin Manager as follows:
- Open Admin Manager.
- From the left navigation panel under System Configurations select Git Integration.
- From the Git integration type dropdown list, select GitLab on-premises. The configuration page opens:
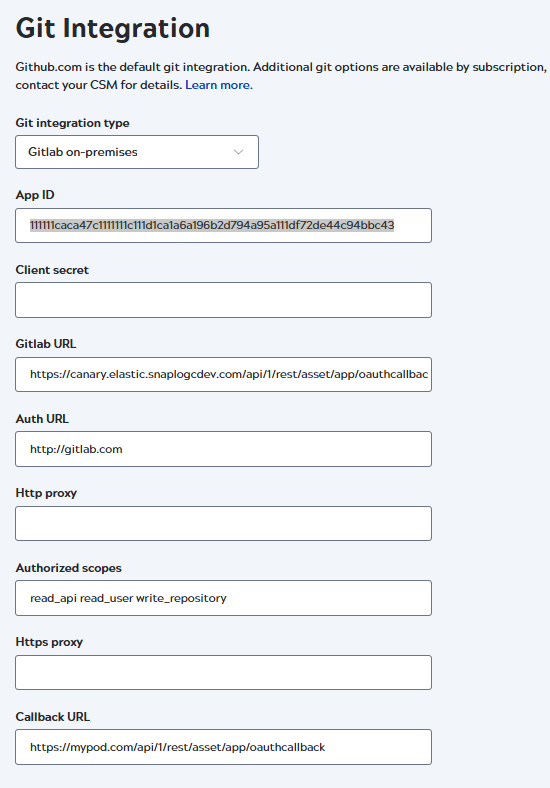
- Enter the following values:
- App ID: The Application ID from the GitLab application.
- Namespaces: An optional, comma-separated list of repository paths that specifies which repositories are visible to developers in the SnapLogic interface. Refer to Repository visibility for the acceptable syntax.
- Client secret: The secret copied from the GitLab application.
- GitLab URL: The App Gateway URL that routes Git requests
between your Groundplex and the GitLab server. Construct the URL using the following
format:
https://org-sidekick-environment-gitlab.controlplane:8095
Where:
- org: Your environment name with hyphens, special characters,
and spaces removed. This doesn't change the environment name, but is required for
the URL. For example,
myenterprise-snap-testbecomesmyenterprisesnaptest. - environment: The value from the
Environment field on your Groundplex
Settings tab, with hyphens, special characters, and
spaces removed. For example,
dev-12becomesdev12. - controlplane: The App Gateway address for your control
plane:
- Production - Global:
appgateway.prod.snaplogic.io - Production - EMEA:
appgateway.emea.snaplogic.io - UAT:
appgateway.uat.snaplogic.io
- Production - Global:
Example: For an environment named
testwith an Environment value ofdevon the Global control plane:https://test-sidekick-dev-gitlab.appgateway.prod.snaplogic.io:8095
- org: Your environment name with hyphens, special characters,
and spaces removed. This doesn't change the environment name, but is required for
the URL. For example,
- Auth URL: The URL for your GitLab server.
- Authorized scopes:
apiread_apiread_userwrite_repository - Callback URL: The Redirect URI from
the GitLab application,
https://control-plane-name.snaplogic.com/api/1/rest/asset/app/oauthcallback.Where control-plane-name is the control plane you are using. For example:- elastic
- uat
- emea
Important: This Callback URL is the same as the Redirect URI that you specified in the GitLab application.
- Click Save.
- Open Project Manager.
- From the left panel select Settings.
- Scroll down to Git Integration and click Configure Git.
- From the Git Integration Type dropdown list, select GitLab on-premises.
The configuration dialog opens:
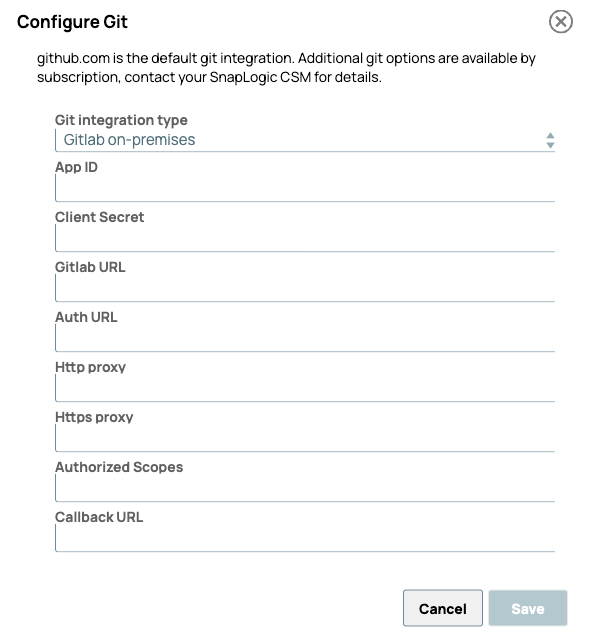
- Enter the following values:
- App ID: The Application ID from the GitLab application.
- Namespaces: Optional. Limits which repositories developers can see in the SnapLogic interface. Enter comma-separated repository paths to restrict access, or leave empty to allow access to all repositories. Refer to Repository visibility for the acceptable syntax.
- Client Secret: The Secret copied from the GitLab application.
- GitLab URL: The App Gateway URL that routes Git requests
between your Groundplex and the GitLab server. Construct the URL using the following
format:
https://org-sidekick-environment-gitlab.controlplane:8095
Where:
- org: Your environment name with hyphens, special characters,
and spaces removed. This doesn't change the environment name, but is required for
the URL. For example,
myenterprise-snap-testbecomesmyenterprisesnaptest. - environment: The value from the
Environment field on your Groundplex
Settings tab, with hyphens, special characters, and
spaces removed. For example,
dev-12becomesdev12. - controlplane: The App Gateway address for your control
plane:
- Production - Global:
appgateway.prod.snaplogic.io - Production - EMEA:
appgateway.emea.snaplogic.io - UAT:
appgateway.uat.snaplogic.io
- Production - Global:
Example: For an environment named
testwith an Environment value ofdevon the Global control plane:https://test-sidekick-dev-gitlab.appgateway.prod.snaplogic.io:8095
- org: Your environment name with hyphens, special characters,
and spaces removed. This doesn't change the environment name, but is required for
the URL. For example,
- Auth URL: The URL for your GitLab server.
- Authorized scopes:
apiread_apiread_userwrite_repository - Callback URL: The Redirect URI from
the GitLab application,
https://control-plane-name.snaplogic.com/api/1/rest/asset/app/oauthcallback.Where control-plane-name is the control plane you are using. For example:- elastic
- uat
- emea
Important: This Callback URL is the same as the Redirect URI that you specified in the GitLab application.
- Click Save.
Configure the Groundplex
Configure the Groundplex you identified in Admin Manager by adding its Environment value to the GitLab URL.
- In the left pane, click Snaplexes.
- Click the Groundplex to open the Update Snaplex page.
- Click the Node properties tab.
- In the Global properties section, click + Add new global property to add the gateway key-value pair:
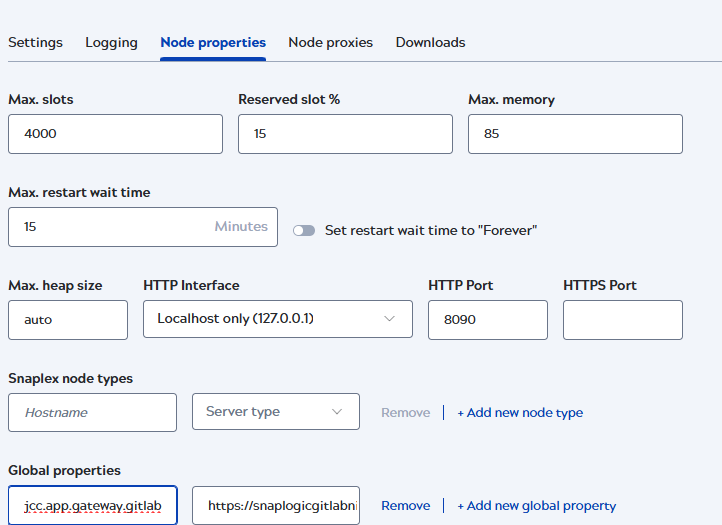
Attention: The GitLab URL value encodes the Environment value from your Groundplex Settings tab, which routes all Git operations through that Snaplex. Add this property to only one Snaplex per environment. Configuring it on additional Snaplexes can cause intermittent Git operation failures. - Enter the following values:
- Key:
jcc.app.gateway.gitlab - Value: The GitLab URL that you specified in the Git Integration settings. Example: https://myorg-sidekick-dev-gitlab.appgateway.prod.snaplogic.io:8095
- Key: