Create a Scheduled Task

Scheduled task

You can create a Scheduled Task for a pipeline either in SnapLogic Designer or Manager table :

  • Designer: In Designer, the pipeline is pre-selected when you open the Create Task dialog window.

  • Manager: In Manager, you must select a pipeline to associate with it.

Note: You can choose from a variety of scheduling options to schedule executions of that pipeline. If you create the Scheduled Task with the default scheduling settings, the pipeline is scheduled to execute five minutes from the time you open the dialog window.
Known issues
  • When creating a Task and selecting the America/Mexico City time zone, the task runtime is off by one hour. Because Mexico City no longer observes Daylight Savings time, the current implementation of CDT (aligned with CST) might assume that Mexico City still changes time zones.

    Workaround: Upgrade your Snaplex to a JDK 11.0.18+ version.

  • The end time of the Scheduled Task, when selected under Date/Time, can erroneously be set earlier than the Start time.
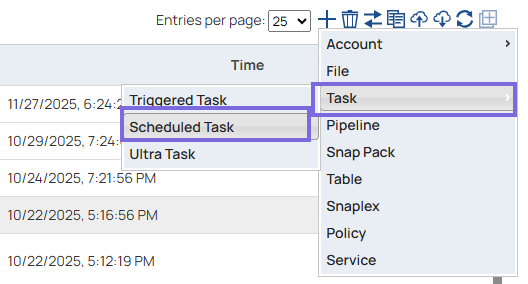
  1. Open the Create Task dialog using one of the following methods:
    • In the Designer toolbar, click the Create Task icon create-task and select Scheduled Task.

    • In Manager, click the Create Task icon and select Scheduled Task.
      create-schedule-task
      The Create Task dialog displays:

  2. In the Create Task dialog, enter the following required options:
    • Name: Provide a name for the scheduled pipeline task. This name is used in the URL when the pipeline has unconnected inputs/outputs.
      Note: The names of assets, projects, or project spaces are limited to UTF-8 alphanumeric characters and these special characters: !"$%&'()*+-.:;<=>@[]^_`{|}~.
    • Pipeline: Choose the pipeline associated with the Scheduled Task from the dropdown list. This pipeline is triggered when you activate the Scheduled Task.

    • Snaplex: Select the Snaplex on which to run the pipeline from the Snaplex dropdown menu.

    • Run Policy: Select Scheduled.

    • Timeout (minutes): Provide the duration for the Timeout.

  3. Configure the Notification settings.
    1. Specify the email addresses, Slack channels, or recipients if Slack integration is configured for the org/environment.
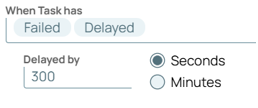
    2. Select the status of the task (from the When Task has dropdown list) based on which the recipients are notified:
      • Started: The task is activated.

      • Completed: The task is completed.

      • Failed: The pipeline did not execute, and hence the task failed.

      • Stopped: The pipeline has stopped abruptly, and the task is no longer running.

      • Suspended: Select this option if the task is based on a Resumable Pipeline that is in a Suspended state.

      • Delayed: The Task is delayed because the pipeline did not start at the scheduled time. You can define the wait time threshold (Delayed by) in minutes or seconds that the SnapLogic Platform must wait before sending out the Delayed Task email/Slack notifications.

  4. Configure the Start Date, Start Time, and Time Zone for the Scheduled Task.
  5. To run a repeatable schedule, select the Execute the Pipeline on a regular schedule checkbox and define the schedule. Learn more about the execution of a pipeline on a repeatable schedule.
  6. To prevent a pipeline from running again if a previous execution of that pipeline is already in progress, select the Do not start a new execution if one is already active checkbox.

    A three-month limit is placed on the Do not start a new execution if one is already active option. A second instance of that Pipeline is able to execute after the three-month period.

  7. Click Save.
  8. Configure the schedule for this Task.
    1. Enter a Start Day/Time, and edit the Time Zone setting if required. Proceed to Step 4 if this Scheduled Task is a one-time execution.
    2. Select the Repeat Execute the pipeline on a regular schedule box to view the scheduling options for specifying how often the associated pipeline should be run.
  9. If applicable, modify the Configuration Options in the dialog window, and click Save.