


Prepare nodes
Preparing Snaplex nodes for enhanced encryption
To enable Enhanced Account Encryption (EAE) in an environment, you must first prepare the self-managed Snaplex nodes. The first time a Snaplex node starts, it generates datakeys files in the /etc/snaplogic directory on its host. The jcc-datakeys.jks file is the keystore and the jcc-datakeys.pass is the password for the keystore. You must manually copy the datakeys files from one node to all Groundplex nodes in your environment.
For TLS connections, the Snaplex also maintains SSL certificates. These aren't used for account
encryption, but are also in the /etc/snaplogic directory. Don't copy them across
nodes, they must be unique for each node. The jcc-serverkeys.jks file is the SSL
keystore and jcc-serverkeys.pass is the password for the keystore.
Prerequisites
To configure EAE:
- Access the SnapLogic platform with Google Chrome version 37 and higher.
- The environment (Org) cannot have a mixture of self-managed Snaplexes and those managed by SnapLogic. Before enabling EAE, work with SnapLogic support to remove Cloudplexes from your environment or convert them to Groudplexes.
- Groundplex nodes must use a Java 11 JRE.
- Nodes can be deployed either on Windows or Linux operating systems:
- For Windows OS, generate the data keys on a Linux machine and copy them to the nodes running on Windows. If all of a self-managed Snaplex’s nodes are on Windows machines, install the Linux RPM (Snaplex installation package) on a Linux machine solely for the purpose of generating or updating the key store using the jcc.sh script.
- For Linux OS, you must use the latest version of the RPM/DEB SnapLogic installer. Download the package if your Snaplex is not running the latest version. If you are setting up a new Snaplex, follow the instructions to install it first.
Generate datakeys files
On a Linux machine that contains the latest Snaplex installation package, generate the key files:
For nodes on Linux
Each machine running a node should have the same Snaplex installation as the machine where you generated the keys. If the nodes are currently running, stop them. Propagate the same datakeys files to every Snaplex in the environment:
- Paste the generated jcc-datakeys.jks and jcc-datakeys.pass files
- Restart each node.
During startup, the nodes upload public keys to the SnapLogic cloud. Org admins can view the keys in the Encryption Settings dialog.
For nodes on Windows
After you generate the key files on a Linux machine, use the same files for all Snaplexes in the environment:
- Copy the jcc-datakeys.jks and jcc-datakeys.pass from the /etc/snaplogic directory of the Linux machine to a secure folder on the Windows machine. A secure folder is one that only those who work with the Snaplex nodes can access.
- Log into the Admin Manager and add the folder name, as the value of a
new
SL_KEY_DIRJava property in the Snaplex configuration file:- Navigate to the target Snaplex, and click it to open the Update Snaplx properties screen.
- Click the Node properties tab.
- In the Global properties field in the Key field, specify jcc.jvm_options.
- In the Value field, specify -DSL_KEY_DIR=folder_name and click + Add a new global property to add the values.
The following example shows how to enter the value for keys stored in c:\\snaplogic_keys:
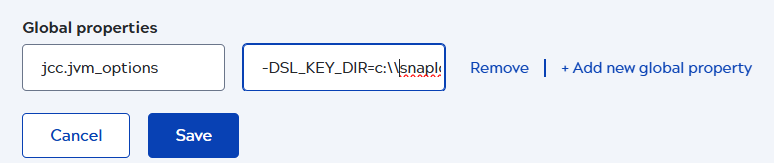
- Click Save.
- Restart the SnapLogic service on all nodes with the updated slpropz configuration.