


Deploy a Groundplex on Kubernetes
Groundplex on Kubernetes using Helm Charts
SnapLogic supports Kubernetes orchestration on your Groundplex instances. You can deploy Snaplex nodes in your Kubernetes environment by creating a Helm Chart that defines the node configuration for discoverability. Although the deployment process differs from other Groundplex installations, both the pipeline runtime and Snaplex execution flows are the same. This article explains how you can deploy and configure SnapLogic Snaplex nodes in a Kubernetes environment and contains an attached Helm Chart that you can use.
Workflow
- Download the configuration file
- Run the Snaplex service
- Deploy the Helm chart
- Deploy a load balancer
- You must be an Environment admin.
- You are familiar with the SnapLogic Snaplex installation process.
Download the configuration file
- In Admin Manager, navigate to your target Groundplex and select it to display the Snaplex page.
- In the Downloads tab, download the
Configuration file or use the API
api/1/rest/public/snaplex/config_file/<path_to_groundplex> to
download the
slpropzfile.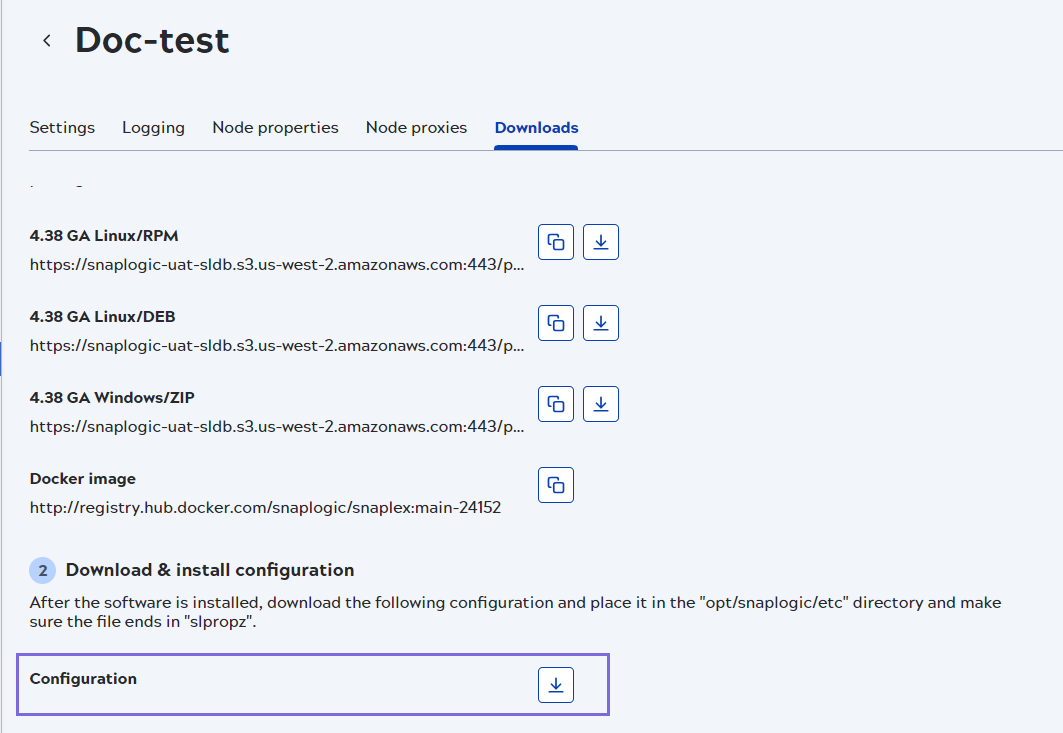
- Click Cancel to exit the screen.
- Use the API to retrieve the information needed to configure a node on a Groundplex.
- GET https://{controlplane_path}/api/1/rest/public/snaplex/config_file/{plex_path}?{query_parameters}. An example would be similar to the path provided below: https://elastic.snaplogic.com/api/1/rest/public/snaplex/config_file/snaplogic/shared/MyGround
- Use the path retrieved from the API in the snaplogic_config_link parameter of the Helm chart. Learn more at Retrieve config info for a Groundplex and Download the slpropz configuration file.
- Set the parameter
snaplogic_secretin the Helm chart YAML file to the name of the Kubernetes secret you create, as described in the Deploy the Helm Chart section.
Run the Snaplex with Environment admin credentials
The Environment admin credentials are required to pull the .slpropz file
for the Snaplex as regular users of an Org cannot spin up and run a Snaplex node. The admins
also fetch the lastest Snaplex settings from the Snaplogic control plane at container start
up time.
The enhanced encryption key is added separately, and enhanced encryption is configured
through Manager. Learn more about Enhanced encryption.
The admin credentials are required each time, because the Kubernetes pod pulls the .slpropz file at start-up.
The Snaplex configuration files are accessed using the configure credentials and require minimum permissions to access the Environment.
Both the credentials for the SnapLogic Environment admin and the Enhanced encryption secret are in JSON format as key/value pairs.
- Generate a key and encode it for each value. We recommend you use Base64 to encode the values.
- To create the SnapLogic secret:
- Create the YAML file with the following two keys, username and password as shown in
the example YAML file:
apiVersion: v1
kind: Secret
metadata:
  name: mysecret
type: Opaque
data:
  username: Base64 username
  password: Base64 password
Tip: Run the following command to encode your username/password into the text of the secret:$ echo -n "snaplogic_username_or_password" | Base64 - Run the following command:
$ kubectl apply -f snaplogic_secret.yamlImportant: If your password includes any of the following characters, you must escape the character with a backslash (\) in the string that you pass to the encoder:\ (backslash) $ (dollar sign) ' (apostrophe or single-quote) ` (backtick) " (double-quotes) & (ampersand) | (pipe symbol) ; (semicolon) ! (exclamation mark) For example, if your password is mypa$$word, pass the string mypa\$\$word to the Base64 encoder.
- Create the YAML file with the following two keys, username and password as shown in
the example YAML file:
- (Optional) If Enhanced Encryption is enabled for your Org, create the Enhanced Encryption secret by running the following commands:
$ kubectl create secret generic enhanced-encryption-secret --from-file=keystore_jks --from-file=keystore_pass$ kubectl apply -f enhanced_encryption_secret.yaml - After the secret is created, delete the YAML file because it is no longer needed.
Important: Refer to the Kubernetes documentation regarding the management of the secret.You can now deploy the Helm Chart
Deploy the Helm chart
- values.yaml: This file is the Helm chart.
- templates folder: Boilerplate charts based on parameters.
- Chart.yaml: This file contains metadata about the artifact repository.
values.yaml file to modify your Kubernetes-based Groundplexes.
Changing the template files can affect the performance of your Groundplex. The following list describes each field parameter in the values.yaml
file:
| Field | Description | Guidelines |
|---|---|---|
| Regular nodes count | Specifies the number of JCC deployed to run the SnapLogic container | If HPA is enabled, then the minReplicas and maxReplicas counts are used from
values.yaml |
| FeedMaster nodes count |
Specifies the number of FeedMaster Pods to deploy. |
N/A |
| Docker image of SnapLogic Snaplex image | Specifies the repository where the image resides and the tag indicating the version of the image. Although you can specify a version of your Snaplex, we recommend that you enter the latest version for the most recently released SnapLogic build. | N/A |
| SnapLogic configuration link | Specifies the link to the SnapLogic JCC configuration file (also known as .slpropz). | N/A |
| SnapLogic Environment admin credential | Specifies the secret (an encoded username and password) to authenticate the deployment. | N/A |
| Enhanced encryption secret | Specifies the secret (an additional encoded username and password) to authenticate the deployment, available only to the user. | N/A |
| CPU and memory limits for the nodes | Specifies the upper limits and requests for the CPU and memory resources. You can set these values for only the upper limits. The lower limits are system-defined and cannot be modified. |
Limits: The maximum amount of resources (CPU and memory) that a container can consume. Requests: The minimum amount of resources that a container needs to function properly. This ensures that the container is always scheduled on a node that can fulfill its minimum requirements. Since Swap space is not available on Kubernetes clusters, we recommend the following:
You can change these values in the Node Properties tab of your Snaplex. |
| Default file ulimit and process ulimit | Specifies the number of possible open file descriptors and processes for the JCC containers. | The value should be greater than the number of slots configured for the node
(Maximum Slots under the Snaplex's node properties). If not set, then the node defaults will be used. (/etc/security/limits.conf). |
| Probes | Monitors the SnapLogic application. | |
| Autoscaling | Sets autoscaling properties. Enabled to false by default. | The HorizontalPodAutoScaler is enabled by setting this property to true. If you plan to use Autoscaling capabilities:
|
| minReplicas maxReplicas |
minReplicas defines the minimum number of Pods that must be running.
maxReplicas defines the maximum number of Pods that can be scheduled on the node(s) |
The general guideline is to start with 1:2 or 1:3 Pods per node. |
| targetAvgCPUUtilization | This is the average CPU utilization across all Pods. HPA will scale up or scale down Pods to maintain this average. | N/A |
| targetAvgMemoryUtilization | This parameter specifies the average memory utilization (as a percentage of the requested memory) that the HPA should maintain across all the replicas of a particular deployment or stateful set. | N/A |
| scaleDownStabilizationWindowSeconds | This parameter controls the amount of time the HPA waits (like a cool-down period) before scaling down the number of pods after a decreasein resource utilization. | N/A |
| Termination Grace Period Seconds | The time to shut down a node gracefully before it gets terminated. | N/A |
| IPv6 | Enabled to False by default. You can enable IPv6 for your connections if your infrastructure supports it. | N/A |
Example Helm chart
  # Default values for snaplogic-snaplex.
   # This is a YAML-formatted file.
   # Declare variables to be passed into your templates.

   # Regular nodes count
   jccCount: 1

   # Feedmaster nodes count
   feedmasterCount: 1

   # Docker image of SnapLogic snaplex
   image:
     repository: snaplogic/snaplex
     tag: latest

   # SnapLogic configuration link
   snaplogic_config_link:

   # SnapLogic Org admin credential
   #snaplogic_secret:

   # Enhanced encryption secret
   #enhanced_encrypt_secret:

   # CPU and memory limits/requests for the nodes
   limits:
     memory: 8Gi
     cpu: 2000m
   requests:
   memory: 8Gi
   cpu: 2000m

   # Default file ulimit and process ulimit
   sl_file_ulimit: 8192
   sl_process_ulimit: 4096

   # Enable/disable startup, liveness and readiness probes
   probes:
     enabled: true

   # JCC HPA
   autoscaling:
     enabled: false

     minReplicas:
     maxReplicas:

     # Average count of Snaplex queued pipelines (e.g. targetPlexQueueSize: 5), leave empty to disable
     # To enable this metric, Prometheus and Prometheus-Adapter are required to install.
     targetPlexQueueSize:

     # Average CPU utilization (e.g. targetAvgCPUUtilization: 50 means 50%), leave empty to disable.
     # To enable this metric, Kubernetes Metrics Server is required to install.
     targetAvgCPUUtilization:

     # Average memory utilization (e.g. targetAvgMemoryUtilization: 50 means 50%), leave empty to disable.
     # To enable this metric, Kubernetes Metrics Server is required to install.
     targetAvgMemoryUtilization:

     # window to consider waiting while scaling up. default is 0s if empty.
     scaleUpStabilizationWindowSeconds:
     # window to consider waiting while scaling down. default is 300s if empty.
     scaleDownStabilizationWindowSeconds:

   # grace period seconds after JCC termination signal before force shutdown, default is 30s if empty.
   terminationGracePeriodSeconds: 900

   # Enable IPv6 service for DNS routing to Control plan
   enableIPv6: false
Steps
- Configure the following parameters in the Helm chart and name the file
values.yaml. - In the Helm chart console, run the following command:
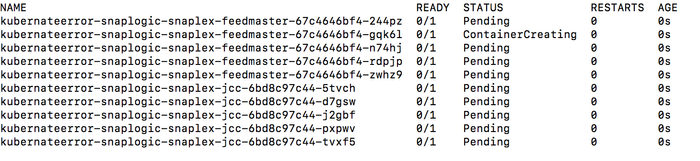
$ helm install snaplogic
            helm_chart_folder
where helm_chart_folder is the Helm Chart ZIP file, which you can download from this document. - Run the Helm list command to determine the status of the deployment. The following
sample output shows a successful deployment:

Warning: If you deploy the Snaplex JCC nodes but resources in the Kubernetes environment are not available to fulfill the Helm Chart, then your deployment goes into a pending state until sufficient resources are available. - The following sample output shows the pending status of resources:
After you deploy your Helm chart, you can deploy a load balancer.
Configure IPv6
- In the values.yaml file of the Helm chart, set the value
enableIPv6: true. - Set the global property for the
jcc.k8s_subdomain_servicein this format:- -- Helm Release Name -snaplogic-snaplex-ipv6.
<Helm Release Name> is set by
Kubernetes. The hostname is the pod name that’s created in Kubernetes. The
snaplogic-snaplex highlighted in the above format is a sample
hostname in the YAML template. This portion of the name should be set as per your
requirement as it is configurable. When you run the helm install command, specify a name for
the release. E.g. helm install -n <namespace> <release_name>.
This creates a pod in the following format:
<release_name>-snaplogic-snaplex-<jcc|feedmaster>-<pod_hash>
Deploy a load balancer
To add load balancers to your JCC and FeedMaster nodes:
- In the Helm console, run the Helm list command to list the services.
- In SnapLogic Admin Manager, navigate to the Snaplexes and select the target Snaplex. The Update Snaplex screen displays.
- On the Settings tab, specify the corresponding values in the
following fields:
- Load balancer: Specify the protocol and port number of the Snaplex JCC node.
- Ultra load balancer: Specify the protocol and port number of the FeedMaster node.
- Review the information and click Save. After the Snaplex and FeedMaster nodes are deployed, you can start designing and running pipelines and Tasks.
For more information on the port number refer to Add load balancers.
Disk sizing guidelines
By default, Kubernetes pods use the disk space of the node they run on, called ephemeral
disk. If ephemeral disk runs low, the Kubernetes pod taking the most disk
space on the node will be evicted (e.g. restarted), and that disk space will be freed up.
Kubernetes pods do not retain ephemeral disk space across restarts, so each time a pod
restarts, its filesystem will be essentially cleared.
The amount of ephemeral disk space a Kubernetes worker node needs is
dependent on the workloads running on that node - how many groundplexes on Kubernetes and
how many other pods are deployed.
If more disk space is needed, a Persistent Volume can be used. In cloud environments like AWS, this is often EBS storage. Persistent volumes can be mounted to pods, and they retain data across restarts.
Best practices
- Avoid running processes in the same container as the JCC so that the JCC has the maximum amount of memory available, as requested.
- Do not overwrite the global properties option unless working with your CSM to customize your Groundplex.
- Request resources upfront. The requests determine the minimum required resources, while
limits set the maximum resources a Container can consume. Setting them to the same amount
ensures stability and exact resource usage. To do this, set the pod’s request and limit to
the same value, as shown in the image below:

Installing utilities
For Kubernetes based deployments, users have to build images/containers that install the utilities in appropriate locations. Those images can use the official Snaplogic image as the base image.
When deploying the Snaplex to Kubernetes, the users would then use that image/container for deployment and have necessary dependencies and utilities in place.
Graceful termination
Kubernetes-based Groundplexes support graceful termination of Snaplex nodes. Whenever
Kubernetes shuts down a container, a PreStop Hook is triggered. In our Helm Chart, we
configure the Kubernetes container to run jcc_prestop.sh script, which does
the following:
- The Groundplex node goes into maintenance mode
- No new pipeline executions are started.
- The JCC node endpoint is polled every 30 secs to check for active pipelines:
- If there are active pipelines, the script sleeps for 30 seconds and checks again.
- If there are no active pipelines, then the script stops the JCC service and terminates the monitor process (which shuts down the container)
- If there are active pipelines beyond the configured
terminationGracePeriodSecondssetting, then Kubernetes forces shutdown of the container.
Our Helm Chart sets the terminationGracePeriodSeconds setting to 15 minutes. The default is 30 seconds.
FAQs
What constitutes the licensed node count for a Groundplex Kubernetes deployment?
The licensed JCC / FeedMaster node count is the number of Kubernetes Containers. You can split the license volume across multiple Nodes and Pods as long as you do not exceed the licensed CPU and memory.
Which configuration would determine license compliance if a user is licensed for 4 8*32 nodes? Is it no of Nodes, Pods or Container?
If a user is licensed for four 8*32 nodes it would mean four containers, each configured with no more than 8vCPU / 32GB RAM. For more information, refer to Groundplex requirements to ensure that the container configurations meet the minimum vCPU and RAM requirements.
Downloads
Download and extract the following files, using the values.yaml file as
the basis for your Helm Chart.