


Configure GitLab cloud and the Git Integration
Configure GitLab.com and the SnapLogic Git Integration.
To use GitLab cloud (gitlab.com), register the SnapLogic Platform with GitLab and configure the Git
Integration feature in your SnapLogic environment. Each registration applies to one control plane
(elastic.snaplogic.com, uat.elastic.snaplogic.com or
emea.snaplogic.com) and covers all environments on that control plane.
Administrative privileges are required:
- In GitLab.com, to:
- Register SnapLogic as an application.
- Create one or more repositories.
- In the SnapLogic environment, to configure the Git Integration feature.
Repository visibility
We recommend that you configure the Git Integration to only access repositories dedicated to SnapLogic assets. This improves the performance of authorization and Git operations in the SnapLogic Platform. It also improves usability by reducing the list of repositories that pipeline developers must choose from during checkout.
- comma-separated list
- group_name/* means all the repositories right under the root, not in subgroups.
- group_name/** means the whole tree
- group_name/subgroup_1/*, group_name/subgroup_1/subgroup_2/* or _name/subgroup_1/subgroup_2/…/subgroup_n/* means all the repositories under the subgroup_1, subgroup_2 or subgroup_n.
- group_name/subgroup_1/**, group_name/subgroup_1/subgroup_2/**, group_name/subgroup_1/subgroup_2/…/subgroup_n/** means all the repositories under the subgroup_1, subgroup_2, or subgroup_n and their descendants subgroups. Here, the first case covers all the others.
- group_name/repositorya, group_name/subgroup_1/repositoryb, group_name/subgroup_1/repositoryc, group_name/subgroup_1/subgroup_2/repositoryd or group_name/subgroup_1/subgroup_2/…/subgroup_n/repositorye means the specific repositories listed: repositorya, repositoryb, repositoryc, repositoryd, and repositorye.
Configure the SnapLogic environment
Configure Git Integration in Admin Manager.
- In the left pane, navigate to .
- From the Git integration type dropdown list, select
GitLab cloud.
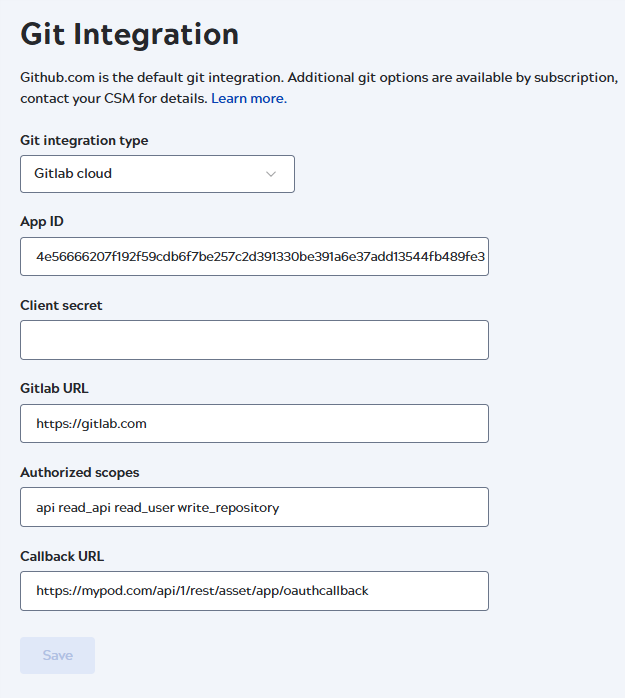
- Enter the following values, some are pre-populated:
- App ID: The Application ID from the GitLab application.
- Namespaces: An optional, comma-separated list of repository paths that specifies which repositories are visible to developers in the SnapLogic interface. Refer to Repository visibility for the acceptable syntax.
- Client secret: Paste the Secret copied from the GitLab application.
- GitLab URL:
https://gitlab.com - Authorized scopes:
apiread_apiread_userwrite_repository - Callback URL: The Redirect URI
from the GitLab application,
https://control-plane-name.snaplogic.com/api/1/rest/asset/app/oauthcallback.Where control-plane-name is the control plane you are using. For example:
- elastic
- uat
- emea
Important: This Callback URL is the same as the Redirect URI in the context of GitLab.
- Click Save.
Next, each user in the environment must Authorize SnapLogic to connect to GitLab.