


REST OAuth1 Account
Overview
You can use this account type to connect REST Snaps with data sources that use OAuth1 accounts.
Limitations
- This account currently works only with Xero API.
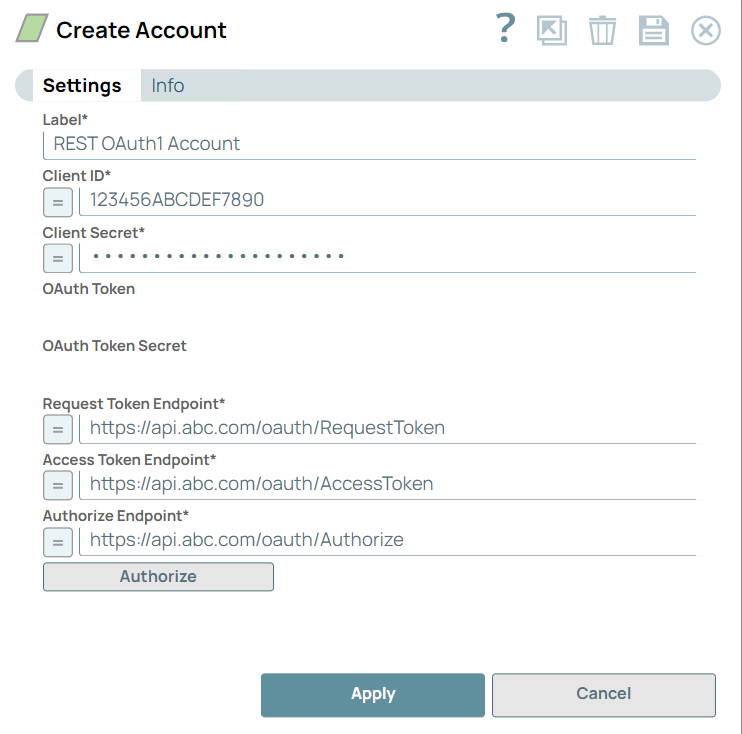
Account settings
- To create your REST OAuth1 account in SnapLogic, you must provide at least your
Client ID, Client secret,
Request Token Endpoint, Access Token
Endpoint, and Authorize Endpoint, and
click Authorize.
Legend:- Expression icon (
 ): Allows using
JavaScript syntax to access SnapLogic Expressions to set field values dynamically (if
enabled). If disabled, you can provide a static value. Learn more.
): Allows using
JavaScript syntax to access SnapLogic Expressions to set field values dynamically (if
enabled). If disabled, you can provide a static value. Learn more. - SnapGPT (
 ): Generates SnapLogic Expressions
based on natural language using SnapGPT. Learn
more.
): Generates SnapLogic Expressions
based on natural language using SnapGPT. Learn
more. - Suggestion icon (
 ): Populates a
list of values dynamically based on your Snap configuration. You can select only one
attribute at a time using the icon. Type into the field if it supports a comma-separated
list of values.
): Populates a
list of values dynamically based on your Snap configuration. You can select only one
attribute at a time using the icon. Type into the field if it supports a comma-separated
list of values. - Upload
 : Uploads files. Learn more.
Field/Field set Type Description Label String Required. Specify the name for the account. We recommend updating the account name if there is more than one account of the same type in your project. Default value: N/A
Example: REST OAuth1 AccountClient ID String Required. Specify the client ID associated with your account. You can create the client ID as advised by your application provider. Default value: N/A
Example: TDNPULHBHYKACJLDDKHCKU5GR0X6PEClient secret String Required. Specify the client secret associated with your account. You can create the client secret as advised by your application provider. Default value: N/A
OAuth Token String Auto-generated after authorization. Specify the token that SnapLogic uses to make API requests on behalf of the user associated with the client ID. Default value: N/A
OAuth Token Secret String Required. Auto-generated after authorization. Specify the refresh token associated with your account. If the refresh token is stored, then the access token can be refreshed automatically before it expires. Default value: N/A
Request Token Endpoint String Specify the endpoint from where the application can retrieve the request token required for the account. Default value: N/A
Example: https://api.xero.com/oauth/RequestTokenAccess Token Endpoint String Required. Specify the URL of the endpoint from where the application can retrieve the access tokens required for the account. Default value: N/A
Example: https://api.xero.com/oauth/AccessTokenAuthorize Endpoint String Specify the endpoint that authorizes the application to access the target database. Default value: N/A
Example: https://api.xero.com/oauth/AuthorizeAuthorize Button Click this button to authorize the REST OAuth1 account using the credentials provided in the Client ID, Client secret, Request Token Endpoint, Access Token Endpoint, and Authorize Endpoint fields. On authorization, SnapLogic places a call-back to the application API. On validation, the target application grants access and generates the OAuth token and secret key.
- Expression icon (
- On authorization, SnapLogic places a call-back to the concerned application API.
On validation of the details you have entered, the target application grants
access to the API and generates the required OAuth token and secret key.The
App Details page for the instance appears.

- In the App Details page, enter:
- App name: Enter the name of the app.
- Company or Application URL: Enter the URL of the application to which you want access.
- OAuth1.0a Callback Domain: Enter the callback domain for your
account, for example:
https://elastic.snaplogic.com/api/1/rest/admin/oauth2callback/rest - Click Save
- On validation of the details, a page appears requesting access to your data.
Click Allow access for 30 minutes to enable the account
to access your data for the specified period of time.

- Once you grant access, the OAuth Token and OAuth Token Secret fields in the Create Account popup are auto-populated, and your account is ready.
- When you start configuring a REST Snap, you must provide the Service
URL associated with the data that you want. You can get the URL
associated with the data from the application to which you want to connect.

For example, in Xero you can retrieve the service URLs you need by selecting the Endpoint you need from the Xero Developer Platform:
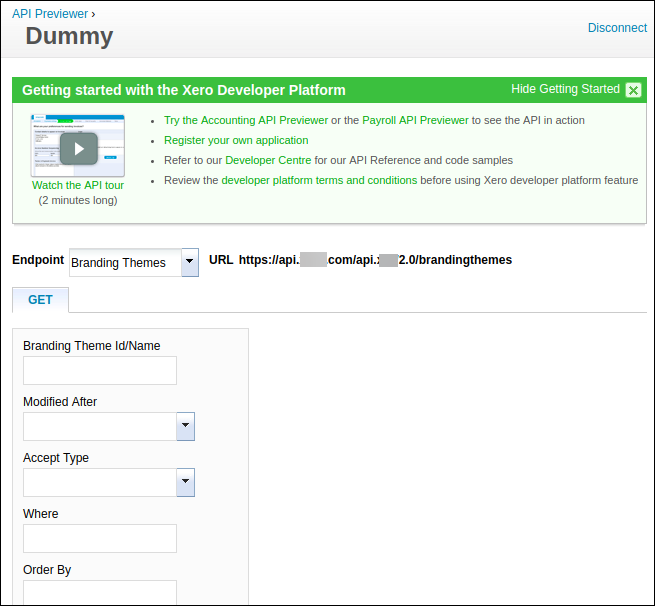
SnapLogic sends your account details to the OAuth1 endpoint specified and populates the Access token, Refresh token, and Access token expiration fields using the details received from that endpoint.
Troubleshooting
One or more required field is blank
- Label
- Client ID
- Client secret
- Request Token Endpoint
- Access Token Endpoint
- Authorize Endpoint
- Label
- Client ID
- Client secret
- Request Token Endpoint
- Access Token Endpoint
- Authorize Endpoint
One or more required field is blank
- OAuth Token
- OAuth Token Secret
You still click Apply.
- Label
- Client ID
- Client secret
- Request Token Endpoint
- Access Token Endpoint
- Authorize Endpoint