


Snowflake Azure Database Account
Overview
You can use this account type to connect Snowflake Snaps with data sources that use the Snowflake Azure Database account.
Prerequisites
- None
Limitations and known issues
None.
Account settings
- Expression icon (
 ): Allows using
JavaScript syntax to access SnapLogic Expressions to set field values dynamically (if
enabled). If disabled, you can provide a static value. Learn more.
): Allows using
JavaScript syntax to access SnapLogic Expressions to set field values dynamically (if
enabled). If disabled, you can provide a static value. Learn more. - SnapGPT (
 ): Generates SnapLogic Expressions
based on natural language using SnapGPT. Learn
more.
): Generates SnapLogic Expressions
based on natural language using SnapGPT. Learn
more. - Suggestion icon (
 ): Populates a
list of values dynamically based on your Snap configuration. You can select only one
attribute at a time using the icon. Type into the field if it supports a comma-separated
list of values.
): Populates a
list of values dynamically based on your Snap configuration. You can select only one
attribute at a time using the icon. Type into the field if it supports a comma-separated
list of values. - Upload
 : Uploads files. Learn more.
| Field/Field set | Type | Description |
|---|---|---|
| Label | String |
Required.
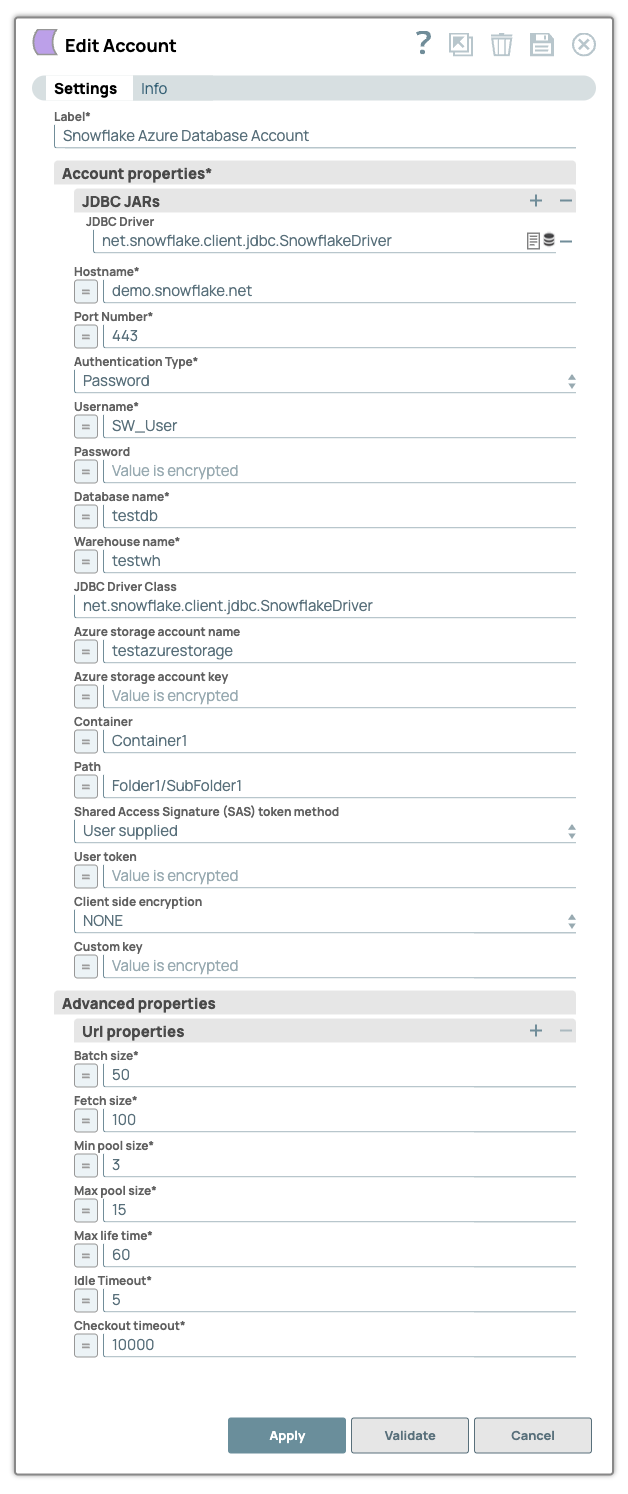
Specify a unique label for the account. Default value: N/A Example: Snowflake Azure Database Account |
| JDBC JARs | Use this field set to add a list of JDBC JAR files to be loaded. By default, the Snowflake account is bundled with the JDBC driver version 3.27.1. However, you can add a custom JAR file. Click + to add a new row for each JDBC JAR file. Add each JAR file in a separate row. See Downloading the JDBC driver for more information about JDBC drivers and downloading the appropriate driver for your account.. | |
| JDBC Driver | String/Expression | Specify the fully-qualified name of the JDBC driver class to be used for connecting to the server. Note: The Snowflake Snap Pack is bundled with the
default Snowflake JDBC driver v3.27.1. Therefore, even if you do not provide a
JDBC Driver, the account does not fail. Default value: N/A Example: snowflake-jdbc-3.27.1.jar |
| Hostname | String/Expression |
Required. Specify the hostname of the Snowflake server to
connect the new account. Default value: N/A Example: demo.snowflake.net |
| Port Number | Integer/Expression |
Required. Specify the port number associated with the
Snowflake database server that you must use for this account. Default value: 443 Example: 332 |
| Authentication Type | Dropdown list |
Required. Choose an authentication type to connect to the
database. The available options are:
|
| Username | String/Expression | Appears when Password is selected. Specify the username to connect to the
Snowflake database server. Default value: N/A Example: SW_User |
| Password | String/Expression | Specify the password associated with the username specified above. This will
be used as the default password while retrieving connections. Default value: N/A Example: ll@98#*00w |
| Encrypted Private Key | String/Expression | Appears when Key Pair is selected in
Authentication Type. Specify the key that you have
generated for authentication. The key must include the generated header and
footer. Note: The Private Key is read, decrypted if necessary, and included with
properties to connect to Snowflake, where it is validated with its paired Public
Key to authenticate the connection. Learn more about configuring and generating a valid key pair Default value: N/A Example:BEGIN PRIVATE KEY-----MIIE6TAbBgkqhkiG9w0BBQMwDgQILYPyennlX2bd8yX8 xOxGSGfvB+99+PmSlex0FmY9ov1J8H1H9Y3lJXXb -----END PRIVATE KEY----- |
| Encrypted Private Key Passphrase | String/Expression | Appears when Key Pair is selected in
Authentication Type. Specify the encrypted passphrase.
Specify the encrypted private key passphrase for authentication. Default value: N/A Example: Nki62lmWfFO75Xg04W+Fnlt9ejiMn4zPbkf/me Aq1R3X7CM/ORLuLms4vU70NjzNYo09SOUXhQmoqpEkQBvrrYuzdaQt5hvwh7vZQh WZ5L8+lTRoAneFtmd6LZ94AssA== |
| Database name | String/Expression |
Required. Specify the name of the database to which you want
to connect. Default value: N/A Example: testdb |
| Warehouse name | String/Expression | Required. Specify the name of the warehouse to which you
want to connect. Default: None Example: testwh |
| JDBC driver class | String | Specify the JDBC driver class to use. Default value: net.snowflake.client.jdbc.SnowflakeDriver Example: net.snowflake.client.jdbc.SnowflakeDriver |
| Azure storage account name | String/Expression | Specify the name of the instance of the Azure storage account. Default: None Example: testazurestorage |
| Azure storage account key | String/Expression | Specify the key to connect to the instance of the Azure storage account listed
above. You can use either of the two keys available in the Access Key tab of the
dashboard in the Azure portal to populate this value. Default: None |
| Container | String/Expression | Specify the name of the Azure storage blob container that you want to use for
hosting files. Default: None Example: Container1 |
| Path | String/Expression | Specify the location of the folder in the container listed above where you want
to host files. Default: None Example: Folder1/SubFolder1 |
| Shared Access Signature (SAS) token method | Dropdown list | Specify the method of supplying the SAS token to the Snaps. You can choose
between the following two options:
|
| User token | String/Expression | Specify the shared access token that you want to use to access the Azure
storage blob folder specified in the Path above. You can get a valid SAS token from
the Azure portal. This property is applicable only when you choose User Supplied
in the Shared Access Token Signature Method field above. Default: None |
| Client side encryption | Dropdown list | Select either of the following options to encrypt the blob before uploading to
Microsoft Azure:
Default: None Example: Custom_Key |
| Custom key | String/Expression | Specify the custom key that you want to use to access the Azure storage blob. This property is applicable only when you select Custom_Key in the Client side encryption field above. The key should be a 128- or 256-bit Base64-encoded key. |
| URL Properties | Use this field set to define
additonal URL properties to use if any. Note: Granting roles You can grant roles to the SnapLogic Snowflake account by using the role parameter in the URL Properties field set. Ensure that the roles are predefined in your Snowflake account before configuring the SnapLogic Snowflake account.
See Roles and Grant Roles for details. |
|
| URL property name | String/Expression | Specify the name of the URL property. Default: None Example: query Timeout |
| URL property value | String/Expression | Specify the URL property value associated with the URL property name. Default: None Example: 0 |
| Batch size | Integer/Expression | Specify the number of statements that you want to execute at a time.
Default value: 50 Example: 40 |
| Fetch size | Integer/Expression | Specify the number of rows you want a query to fetch during each execution.
Note: Large values could cause the server to run out of memory. Default value: 100 Example: 200 |
| Min pool size | Integer/Expression | Specify the minimum number of idle connections that you want the pool to
maintain at a time. Default value: 3 Example: 2 |
| Max pool size | Integer/Expression | Specify the maximum number of connections that you want the pool to maintain at
a time. Note: Snowflake Bulk Load/Bulk Upsert/S3 Upsert Snap requires a minimum of 2
connections per Snap in a pipeline. For example, if a pipeline has a Snowflake
Bulk Load Snap and an S3 Upsert Snap, then the pool size must be greater than or
equal to 4 for successful execution.
Default value: 15 Example: 40 |
| Max lifetime (minutes) | Integer/Expression | Specify the maximum lifetime of a connection in the pool. Ensure that the value
you enter is a few seconds shorter than any database or infrastructure-imposed
connection time limit. A value of 0 indicates an infinite lifetime, subject to the
Idle Timeout value. An in-use connection is never retired. Connections are removed
only after they are closed. Default value: 60 Example: 50 |
| Idle timeout (minutes) | Integer/Expression | Specify the maximum amount of time a connection is allowed to sit idle in the
pool. A value of 0 indicates that idle connections are never removed from the
pool. Default value: 5 Example: 4 |
| Checkout timeout (milliseconds) | Integer/Expression | Specify the number of milliseconds you want the system to wait for a connection
to become available when the pool is exhausted. Note: If you provide 0, the Snap
waits infinitely until the connection is available. Therefore, we recommend you
not to specify 0 for Checkout Timeout. For any other value, the system throws an
exception after the wait time has expired. Default value: 10000 |
Generating a Valid Key Pair
- In a Linux terminal, run the following command to generate a Private Key stored in PKCS8
format::
openssl genrsa 2048 | openssl pkcs8 -topk8 -inform PEM -out rsa_key.p8 - Generate a public key by referencing the previously generated private key
rsa_key.p8 : openssl rsa -in rsa_key.p8 -pubout -out rsa_key.pub - Store the generated private key (
rsa_key.p8) and public key (rsa_key.pub) in a safe location. - In the Snowflake console, assign the public key to the required Snowflake user. Exclude
the header and footer from the public key
ALTER USER jsmith SET
            RSA_PUBLIC_KEY='MIIBIjANBgkqh...';
. - In the Snowflake console, verify the assignment of the public key to the required
Snowflake user:
DESC USER jsmith; - Specify the entire Private Key and include the header and footer in the Private Key field of the Snowflake account.
Troubleshooting
| Error | Reason | Resolution |
|---|---|---|
| Unsupported Private Key format | Only PKCS8 format is supported. | Provide a PKCS8 format Private key and retry. |
| Unable to read Private Key |
|
|
| Failed to validate account | The specified Private Key is unencrypted, and unencrypted Private Key is not supported. | Specify a valid Encrypted Private Key |
| Failed to retrieve a database connection. | Connection is not available; request time out after 10000ms. | Increase the maximum pool size in account configuration. |