


Reltio OAuth2 Account
Overview
You can use this account type to connect Reltio Snaps with data sources that use the Reltio OAuth2 Account.
Prerequisites
- Reltio Tenant Access
- Client ID and Client Secret
- Authorization Server Endpoint
- API Permissions to perform the required operations.
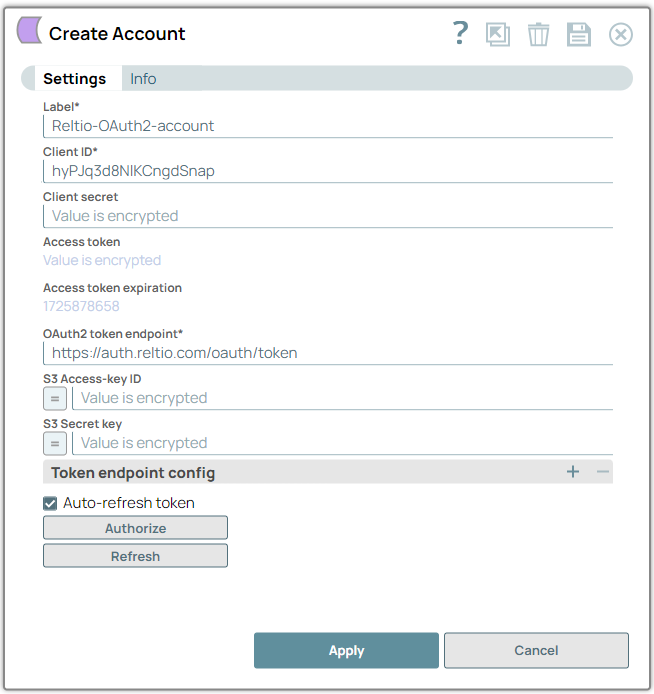
Account settings
| Field/Field set | Description |
|---|---|
Label*
String |
Specify the name for the account. Modify the
account name if there is more than one account of the same account type in your
project.
Default value: N/A Example: Reltio OAuth2 Account |
Client ID*
String |
Specify the client ID associated with your
account. You can create the client ID as advised by your application provider. Learn
more about Client credentials grant type.
Default value: N/A Example: p364e45x-953x-460p-9pb0-934xep16p693 |
Client secret
String |
Specify the client secret associated with your
account. You can create the client secret as advised by your application provider.
Note: Client ID and Client secret are essential for authenticating your application
with Reltio's OAuth2 service.
Default value: N/A Example: <Encrypted> |
Access token
String |
Auto-generated after authorization. Specify the token that SnapLogic
uses to make API requests on behalf of the user associated with the client ID.
Default value: N/A |
Access token expiration
Integer |
Auto-generated after authorization.
By default, tokens expire after 60 minutes. To authenticate into Reltio using scripts or integrations, you must get a token, store it, and use it until it expires. You must get a new token after the current one expires. Default value: N/A |
OAuth2 token endpoint*
String |
Specify the URL of the Reltio's authorization server where the token request
will be sent.
Default value: https://auth.reltio.com/oauth/token Example: https://auth.reltio.com/oauth/token |
S3 Access-key ID
String/Expression |
Specify the S3 Access key ID as a part of AWS authentication.
Note:
Default value: None Example: AKIAIOSFODNN7EXAMPLE |
S3 Secret key
String/Expression |
Specify the S3 Secret key as a part of AWS Authentication.
Note:
Default value: None Example: wJalrXUtnFEMI/K7MDENG/bPxRfiCYEXAMPLEKEY |
| Token endpoint config | Use this field set to provide custom properties for the OAuth2 token endpoint. |
Token endpoint parameter
String |
Define an optional token endpoint parameter.
Default value: N/A Example: https://auth.example.com/oauth2/token |
Token endpoint parameter value
String |
Specify the value associated with the optional endpoint parameter defined above.
Default value: N/A Example: client_credentials |
Auto-refresh token
Checkbox |
Select this checkbox to refresh the token automatically using the refresh
token, if the property is enabled. If this property is deselected, the token expires
and is not refreshed automatically.
Default value: Deselected |
Authorize
Button |
Click this button to authorize the REST OAuth2 account using the credentials provided in the Client ID, Client secret, and OAuth2 token endpoint fields. |
Refresh
Button |
Appears only after the first Authorize flow.
Click this button to refresh the access token. |