


Manage MCP Server Assets
View, edit, enable, disable, copy, export, import, and delete MCP Server assets from SnapLogic Manager.
SnapLogic provides a centralized interface in Manager for managing the lifecycle of your MCP Server assets. From this dashboard, platform administrators can maintain strict control over which AI tools are exposed to the organization at any given time.
Access the MCP Server Manager
To view and manage your registered MCP Servers:
- Log in to your SnapLogic environment.
- Open the Project Manager page.
- Navigate to the target folder, and click the MCP Server tab.
- Select an MCP Server.
The Asset toolbar icons are actionable. Icons that are grayed out indicate the associated operation is not supported.
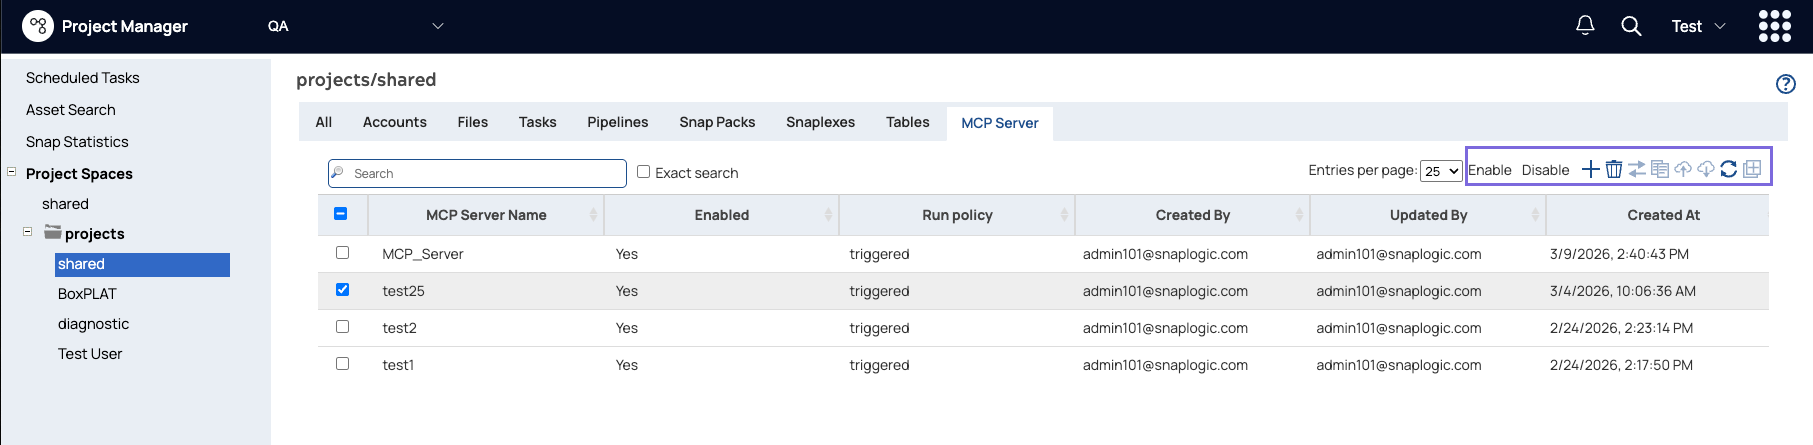
The MCP Server tab lists all currently registered servers in your environment. Copy, Import, and Export operations are also available from the All page asset toolbar.
Asset Management
| Field/Field set | Description |
|---|---|
| View |
Click a registered server to see its full configuration details, including the assigned Snaplex, the linked Authentication Policy, and the MCP Server URL generated upon registration. 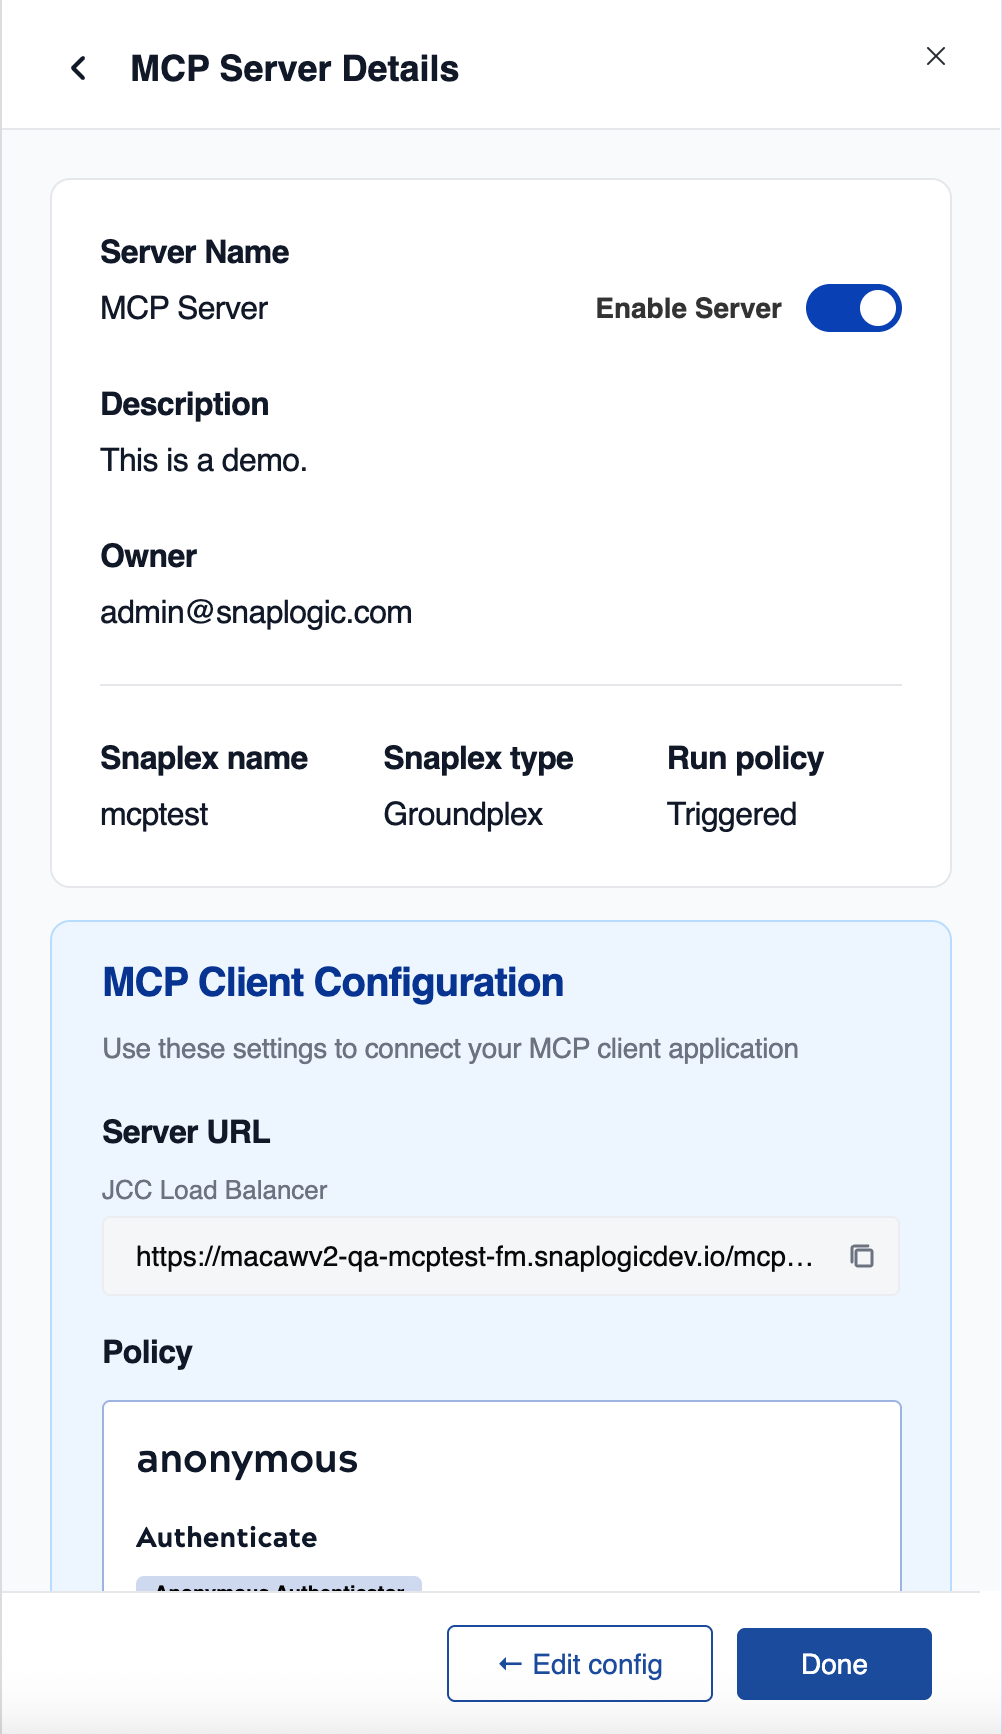 |
| Create | Click Create and select the target pipeline to register a new MCP Server directly from Manager, without opening the pipeline in Designer. Refer to Register MCP Server. |
| Edit | Select the server and click Edit to change the Authentication Policy, update the description, or move the server to a different Snaplex. Editing the asset does not affect the underlying pipeline logic. |
| Enable / Disable | Temporarily pause an MCP Server without deleting it. Disabling the server immediately stops AI clients from accessing the tools and returns an error until the server is re-enabled. Use this for maintenance windows on underlying systems. |
| Copy |
Select the MCP Server asset and click Copy to duplicate the registration to another project or project space. When copying, SnapLogic automatically attempts to resolve each dependency in the destination:
Important: If any required dependency cannot be resolved, the copied
asset is created in a disabled state. Open the asset, supply the missing
settings, and enable it manually before clients can connect.
|
| Export | Select the MCP Server asset and click Export to include
it in a project .zip export. The exported package captures the
MCP Server registration metadata (name, description, Snaplex assignment,
Authentication Policy reference) along with the underlying pipeline.
Note: The MCP Server checkbox in the project
export dialog is visible only when the org subscribes to the MCP Server
feature.
|
| Import |
Click Import to upload a project .zip file containing an exported MCP Server asset and its underlying pipeline. SnapLogic automatically attempts to resolve each dependency (Snaplex, Authentication Policy, and pipeline) in the target environment. Note: The MCP Server option in the
import dialog is visible only when the org subscribes to the MCP Server
feature.
Refer to Import and export project. |
| Delete |
Remove the MCP Server registration and its public MCP endpoint. This operation moves the MCP Server asset to the Recycle Bin in Project Manager. When you empty the recycle bin, the asset is permanently deleted. Note: Deleting an MCP Server does not delete the underlying SnapLogic
pipeline.
|
Import an MCP Server asset
You can import an MCP Server asset from a project .zip file exported from another environment.
- In Manager, navigate to the project space where you want to import the assets.
- Open the project context menu and select Import.
- Upload the .zip file containing the exported MCP Server asset and pipeline.
- If the org subscribes to MCP Server, the Import dialog displays an MCP Server override setting. Configure this setting as needed for the target environment.
- Select whether to Keep existing assets or Overwrite existing assets if duplicates are detected, then click Import.
- After the import completes, verify the asset state. SnapLogic automatically attempts to
resolve each dependency in the target environment:
- Snaplex: Resolved by matching the equivalent path in the target org. If no match is found, the field is left empty.
- Authentication Policy: Resolved by searching the target org. If no matching policy is found, it is unlinked from the imported asset.
- Pipeline: If the pipeline is exported and imported together with the MCP Server asset, the import relinks to the new pipeline. If the pipeline is not included, SnapLogic attempts to resolve it by path. If the pipeline cannot be found or accessed, the MCP Server is imported without a linked pipeline.
If any required dependency cannot be resolved, the imported asset is created in a disabled state. Open the asset, supply the missing settings, and enable it manually.
Migrate an MCP Server asset
When you migrate a project to another org, the MCP Server asset migrates with it. If the target project already exists, tasks and accounts are not selected by default on the assumption that they are already configured for the target environment. Selecting them displays a warning about the risks of overwriting existing assets.
To migrate an MCP Server to another org, use the Migrate operation in Project Manager. Refer to Migrate projects to another org.
Support for copying, importing/exporting, and migrating MCP assets
When you copy, import, or migrate an MCP Server asset, SnapLogic attempts to resolve each dependency in the target environment. The following table describes the resolution behavior and what happens when a dependency cannot be found.
| Scenario | Pipeline | Snaplex | Authentication Policy |
|---|---|---|---|
| Copy, import, or migrate the MCP Server asset only (without dependencies) | Resolved by path in the target directory. If not found, set to empty and the MCP Server is disabled. | Resolved by equivalent path in the target org (for example,
/source-org/rt/cloud/dev →
/target-org/rt/cloud/dev). If not found, set to empty and the
MCP Server is disabled. |
Resolved by path in the target directory. If not found, set to empty and the MCP Server is disabled. |
| Copy, import, or migrate the MCP Server asset with dependencies | Relinked to the newly copied or imported pipeline. | Snaplex does not support copy, migrate, or export/import. Resolved by path only. | Supports copy, migrate, and export/import operations. |
Import and export MCP policies
You can copy, import, and export MCP policies at the Project or shared folder level in Project Manager. All operations require the target org to be in the trusted list of the source org.
Copy a policy
- In Project Manager, navigate to the Project or shared folder containing the policy you want to copy.
- Click the arrow next to the Project or shared folder to open the context menu, and select Manage API Policy. The API Policy Manager dialog opens.
- Select the policy and click Copy.
- In the Copy dialog, select the destination org, Project Space, and Project, then click Copy.
Import a policy
- In Project Manager, navigate to the target Project or shared folder.
- Click the arrow next to the Project or shared folder to open the context menu, and select Manage API Policy. The API Policy Manager dialog opens.
- Click Choose File and navigate to the policy file on your machine.
- Select an import option:
- Import non-existent only (default): Uploads only the policies in the selected file that do not already exist in the target Project or shared folder.
- Import all policies: Imports all policies in the selected file, overwriting any that already exist.
- Click Import. The Import Policy Result dialog shows the
outcome for each policy:
- Added: The policy was added to the Project or shared folder.
- Overwritten: An existing policy was replaced by the imported one.
- Ignored: An existing policy was not overwritten.
Export a policy
- In Project Manager, navigate to the target Project or shared folder.
- Click the arrow next to the Project or shared folder to open the context menu, and select Manage API Policy. The API Policy Manager dialog opens.
- Click Export. The policies are downloaded as a file to your default Downloads folder.
Git operations for MCP Server assets
When your environment is integrated with Git, MCP Server assets support the same Git operations available for other project assets in Project Manager.
Server-level Git operations
The following Git operations are available at the MCP Server level in Project Manager:
| Field/Field set | Description |
|---|---|
| Checkout Git Repository | Check out a repository and select a branch or tag to work from. Refer to Checkout a branch or tag. |
| Git Add Tag | Add a Git tag to the MCP Server for version marking. Refer to Add a tag. |
| Commit to Git | Commit changes to an MCP Server to the associated Git repository. Refer to Commit updates. |
| Git Pull | Pull the latest changes made by other users into the MCP Server. Refer to Pull from the repository. |
Asset-level Git operations
In the Assets tab of your MCP Server, you can manage individual assets similarly to project assets in Project Manager. MCP Server assets are tracked by Git repository and Git status. Select an asset or click on it to open the Git options menu. The following operations are available:
| Field/Field set | Description |
|---|---|
| Checkout Git Repository | Check out the asset from its associated Git repository. Refer to Checkout a branch or tag. |
| Commit to Git | Commit changes to the selected server asset to Git. Refer to Commit updates. |
| Git Pull | Pull the latest changes to the selected server asset. Refer to Pull from the repository. |
| Add to Repository | Add the server asset to the Git repository for tracking. Refer to Add a single asset. |
| Update Git status | Refresh the displayed Git status for the asset. |