


Configure Atlassian Bitbucket Data Center and the Git Integration
Configuration for the SnapLogic Git Integration to use Bitbucket Data Center.
The SnapLogic Platform supports Atlassian Bitbucket Data Center for integrated version control, which allows you to manage SnapLogic assets including pipelines and tasks to and from Bitbucket repositories and branches. This integration supports two authentication modes for Bitbucket API calls:
-
Basic authentication (username and HTTP access token)
-
SSH key authentication (SSH public/private key pair and HTTP access token when basic authentication to API calls is disabled)
An HTTP access token is required at all times, regardless of the authentication mode. However, SSH key authentication is required when your organization has disabled basic authentication on the Bitbucket Datacenter API. This configuration is done at the Environment level by the Environment Admin.
Benefits
The SnapLogic Bitbucket Integration has the following benefits:
- Ability to manage SnapLogic assets in Bitbucket projects and repositories.
- Seamless version control: Developers can manage versioning directly within SnapLogic, eliminating the need to switch tools.
- Streamlined development workflows: Reduces complexity and manual effort, enabling faster, more efficient development cycles.
- Enhanced collaboration: Centralized platform improves coordination across teams and ensures consistency in development practices.
- Reduced error rates: Minimizes human error by automating critical version control and deployment steps.
- Improved audit readiness and maintainability: Robust asset tracking and documentation facilitate compliance, support audits, and ensure long-term sustainability.
To use Atlassian Bitbucket Data Center, register SnapLogic with Atlassian Bitbucket and configure the Git Integration feature in your SnapLogic environment (Org).
- In Atlassian, you need:
- Bitbucket installed to handle user authentication requests.
- One or more Bitbucket repositories for SnapLogic assets.
- In the SnapLogic environment:
- A subscription to the SnapLogic Atlassian Bitbucket Data Center feature for each environment.
- Admins must enable Bitbucket in Admin Manager and users have to Manage Bitbucket access token from the User profile menu.
Basic authentication for Bitbucket
To set up the Bitbucket repositories in SnapLogic, establish proper authentication and configure the Git provider settings.
- Access the Bitbucket Repository
- Navigate to your Bitbucket workspace and click on the
Snaplogic project link to open it.
This displays all repositories within the project.
- Click on the repository to view its contents and verify you have Project write and Repository write access to the appropriate repositories and SnapLogic projects for the token.
- Navigate to the HTTP access tokens and click
Create token to generate tokens. You can generate any number of tokens
for any number of SnapLogic users to use. option to authenticate the
configuration.

- Navigate to your Bitbucket workspace and click on the
Snaplogic project link to open it.
- In SnapLogic Admin Manager, navigate to System
Configuration and select Git Integration.
- Select Atlassian Bitbucket Data Center (the label might say
Atlassian Bitbucket) as the Git provider and configure the following fields:
- Bitbucket Auth: The Basic Auth header value to securely connect to
Bitbucket. Example:
c25hcGxvZ2ljX3VzZXI6TXlTZWNyZXRQYXNzd29yZDEyM - Bitbucket APIs URL: The root URL of your Bitbucket Data Center
instance
https://<bitbucket-hostname>. Example:https://bitbucket.company.com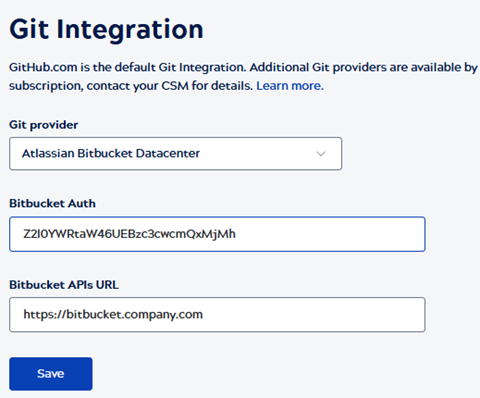
- Bitbucket Auth: The Basic Auth header value to securely connect to
Bitbucket. Example:
- Select Atlassian Bitbucket Data Center (the label might say
Atlassian Bitbucket) as the Git provider and configure the following fields:
SSH Authentication for Bitbucket
-
You must have the Org Admin role in SnapLogic.
-
Each SnapLogic user who will access Git operations must have an HTTP access token associated with their Bitbucket account. HTTP access tokens are required regardless of whether SSH authentication is enabled. Learn more about creating an HTTP access token.
-
If SSH authentication is required, obtain the SSH hostname from your Bitbucket Data Center administrator.
- In SnapLogic Admin Manager, select Git Integration under SYSTEM CONFIGURATION.
- On the Git Integration page, select Atlassian Bitbucket Data Center as the Git Integration type.
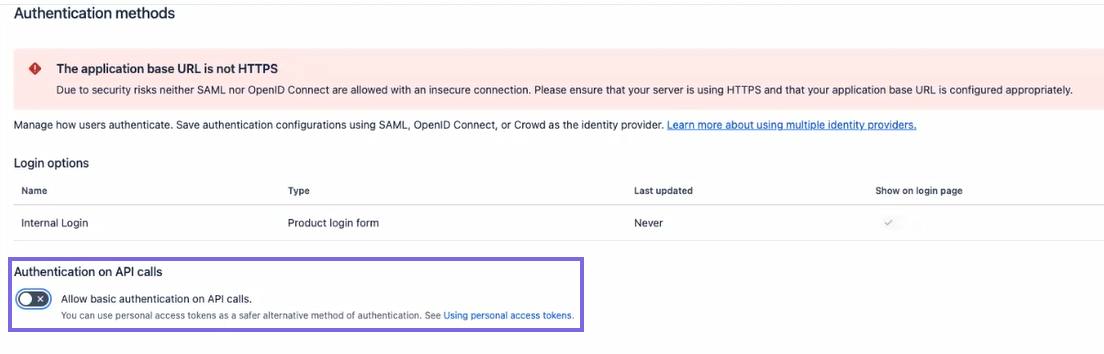
- Turn off the toggle for Allow basic authentication on API calls (this
setting reflects your Bitbucket Data Center server configuration) and specify
the following values:
-
Bitbucket Auth URL: The Bitbucket Auth URL to securely connect to the Bitbucket. Example:
https://bitbucket.company.com -
Bitbucket APIs URL: The root URL of your Bitbucket Data Center instance <
https://<bitbucket-hostname>. Example:https://bitbucket.company.com SSH host: Enter your Bitbucket Data Center SSH host beginning with
ssh://, for example,ssh://[email protected]:7999/project-key/repository-name.git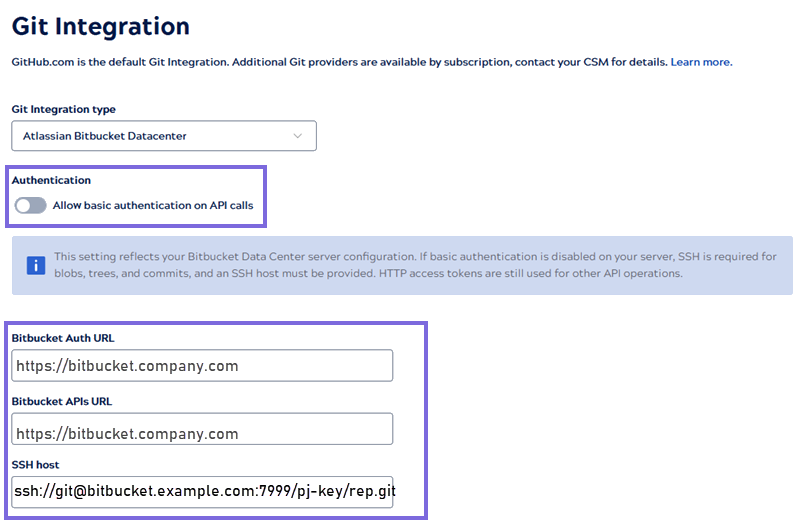
-
- Click Save.
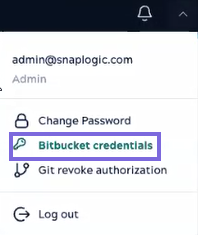
- On the User profile, select Bitbucket credentials.
-
Provide the following values. Generate an SSH key pair if you do not already have one (for example, using ssh-keygen on a local machine). Retain both the public and private keys.
-
HTTP Access Token: Personal HTTP access token generated in Bitbucket Data Center. This is required for all API calls regardless of the authentication mode. Learn more.
-
SSH public key: Paste the full contents of your public key file (for example, the output of your id_rsa.pub file).
SSH private key: Paste the full contents of your private key file. This value will be encrypted.
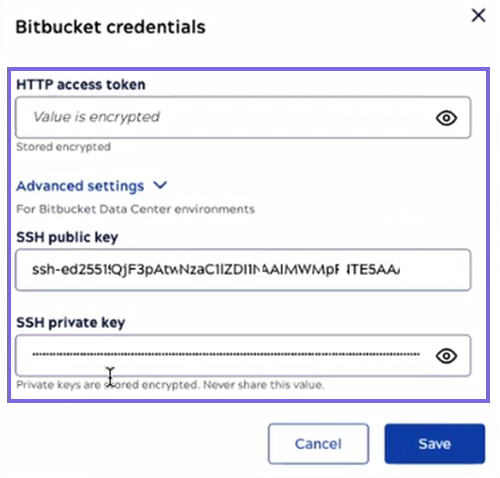
- Click Save.
Note: The SSH Private Key is sensitive. Ensure you are pasting the private key (not the public key) into the SSH Private Key field. Once saved, the key cannot be retrieved from the SnapLogic UI. -
Verify the authentication
- On the top-right, click your user profile and select Git
authorization.
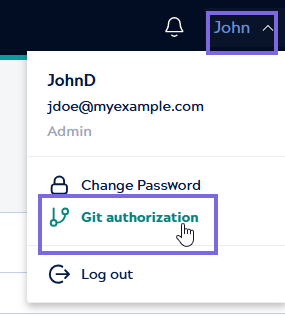
After successful authorization, the following message displays, and you can proceed to check out your Git repository.
Create a personal HTTP access token
-
In Bitbucket Data Center, select your profile icon, and then select Manage account.
-
In the left navigation pane, select HTTP access tokens, and then click Create token.
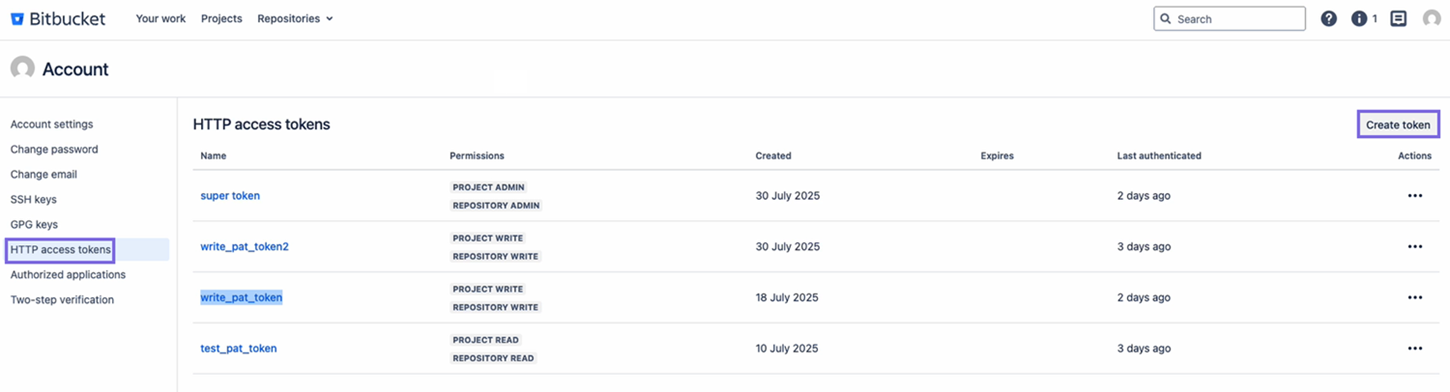
- Provide a token name, set the required permissions (at minimum, Repository Read and Repository Write), and select Create.
- Copy and save the token value. It is displayed only once.
Authorize SnapLogic with Bitbucket Data Center
After the admin saves the org-level settings, users authorize SnapLogic to access their Bitbucket accounts.
- In the SnapLogic Project Manager, open a project to track a Bitbucket repository, or begin the checkout flow for a new repository.
- When prompted, select Authorize with Bitbucket Data Center.
- Follow the prompts to authenticate with your Bitbucket credentials.
Troubleshooting
| Error | Resolution |
|---|---|
| Authentication error after saving credentials |
|
| SSH connection refused or timed out |
|
| SSH Host and SSH key fields are not visible in Admin Manager | The SSH Host and SSH keys are visible only when Allow basic authentication on API calls is disabled in Bitbucket and in Admin Manager. |