


Google BigQuery Google Service Account
Configure a Google BigQuery Google Service Account to authenticate with Google BigQuery using a P12 key file.
Overview
Use this SnapLogic Account type to connect Snaps to Google BigQuery using a Google service account.
Prerequisites
-
Existing Google Service Account with P12 file containing the private key. Learn how to import P12 File into the Google Service Account.
-
JDK with Keytool utility to set up the Keystore.
Limitations and Known Issues
None.
Account Settings
Configure the following settings for the Google BigQuery Google Service Account:
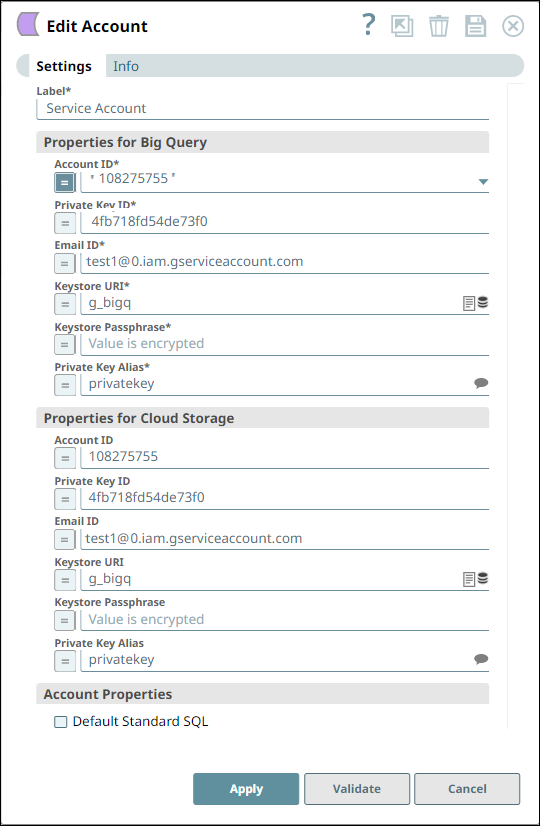
BigQuery Properties:
| Field/Field set | Description | ||
|---|---|---|---|
| Label String |
Required. Specify a unique label for the account. Default value: N/A Example: BigQuery P12 Service Account |
||
| Account ID String |
Required. The service account email address from Google Cloud Console. Default value: N/A |
||
| Private Key ID String |
Required. The private key ID from the service account. Default value: N/A |
||
| Email ID String |
Optional. The email address associated with the service account. Default value: N/A |
||
| Keystore URI String |
Required. The URI to the Java keystore containing the imported P12 key. Default value: N/A |
||
| Keystore Passphrase String |
Required. The passphrase for the keystore. Default value: N/A |
||
| Private Key Alias String |
Required. The alias used when importing the P12 key into the keystore. Default value: N/A |
||
| Default Standard SQL Checkbox |
Optional. Select this checkbox to use Standard SQL dialect by default in all Snaps that support SQL queries. If not selected, Legacy SQL will be used by default. Default status: Deselected |
||
Cloud Storage Properties:
| Field/Field set | Description | ||
|---|---|---|---|
| Account ID Integer/Expression |
Specify the ID of the service account available in the Google web console. Default value: N/A Example: 108275755 |
||
| Private Key ID String/Expression |
Specify the ID of the private key available in the Google web console. Default value: N/A Example: 4fb718fd54de73f0 |
||
| Email ID String/Expression |
Specify the email id of the the service account available in the Google web console. Default value: None. Example: [email protected] |
||
| Keystore URI String/Expression |
Specify the location of the Keystore that contains the private key to be used. Click the browse icon to load into/select from SLDB. Default value: N/A Example: test/g_bigquery |
||
| Keystore Passphrase String/Expression |
Specify the passphrase to access the Keystore. Default: N/A Example: Encrypted value |
||
| Private Key Alias String/Expression |
Specify the alias to identify the private key. This is a suggestible field and will list all the aliases in the key store. Default value: N/A Example: privatekey |
||
| Default Standard SQL Checkbox |
Select this checkbox if you want to default the dialect in the Query field in the Snaps using this account to Standard SQL. Important: Use the #legacySQL tag in the Query field of the Snap to treat it as a Legacy SQL Query.Default: Deselected |
||
Generating the JSON Key
- Create a Service Account in the Google Cloud console.
- Assign a predefined BigQuery role. Alternatively, you can create a custom role and grant permissions to the role.
Important:
Insufficient permissions causes the Snap to fail.
- Create a JSON Key containing the public/private key pair. This JSON file is downloaded to your machine when you create the service account. You also must upload it to the SLDB.
Importing P12 File
Key Steps
- Create a new Keystore.
- Empty the Keystore.
- Verify if the Keystore is empty.
- Import the P12 file.
- Check the Keystore is non-empty.
- Change the alias, if needed.
- Verify a new alias.
To perform the above steps, open a Command Prompt window. The steps along with the requisite syntax are described in detail below:
Step 1 - Create New Keystore
-
Execute the following command at the Command Prompt.
keytool -genkey -alias <some alias> -keyalg RSA -keysize 2048 -keystore <keystore name> Example: keytool -genkey -alias demoalias1 -keyalg RSA -keysize 2048 -keystore demokeystore1 -
Specify the follow-up questions for First and Last name, Organizational unit name, Organization name, City/Locality, State/Province, and Two-letter country code.
-
Click Yes in the Details confirmation dialog box.
-
Enter the key password for the provided alias.
-
Press Enter.
The same key password will be used in the subsequent steps.
Step 2 - Empty the Keystore
-
Execute the following command at the Command Prompt:
keytool -delete -alias <alias name> -keystore <keystore name> Example: keytool -delete -alias demoalias1 -keystore demokeystore1 -
Enter the password as given in Step 1.
Step 3 - Verify if Keystore is Empty
-
Execute the following command at the Command Prompt:
keytool -v -list -keystore <keystre name> Example: keytool -v -list -keystore demokeystore1 -
Enter password as given in Step 1.
The response should be "Your keystore contains 0 entries".
Step 4 - Import the P12 file
-
Execute the following command at the Command Prompt:
keytool -v -importkeystore -srckeystore <p12file.p12> -srcstoretype PKCS12 -destkeystore <keystore name> -deststoretype JKS -destkeypass <password for private key (should be same as keystore passphrase)> Example: keytool -v -importkeystore -srckeystore sample_p12_file.p12 -srcstoretype PKCS12 -destkeystore demokeystore1 -deststoretype JKS -destkeypass demoPassword1 -
Enter the destination Keystore password given in Step 1.
-
Enter the source Keystore password that was obtained while generating P12 file.
The response should be "Import command completed: 1 entries successfully imported, 0 entries failed or canceled".
Step 5 - Check Keystore to be Non-empty
-
Execute the following command at the Command Prompt:
keytool -v -list -keystore <keystre name> Example: keytool -v -list -keystore demokeystore1 -
Enter password as given in Step 1. The response should show:
Keystore type: JKS
Keystore provider: SUN
Your keystore contains 1 entry
Alias name: privatekey
Creation date: 12 Oct, 2017
Entry type: PrivateKeyEntry
The Keystore is ready with one entry having a private key imported from the P12 file. The alias for that private key is privatekey.
Steps 6 & 7 are needed if you want to change the alias for the imported private key.
Step 6 - Change Alias if needed
-
Execute the following command at the Command Prompt:
keytool -changealias -keystore <keystore name> -alias <current alias> -destalias <new alias>
Example:
keytool -changealias -keystore demokeystore1 -alias privatekey -destalias first_entry
The response will be blank if the change is successful.
Step 7 - Verify New Alias
Repeat Step 5 and ensure the alias name is what is given in Step 6. The Keystore "demokeystore1" is ready to be used in the snaps with the passphrase given in Step 1.
Supported Snaps
All Snaps in the Google BigQuery Snap Pack support the Google BigQuery Google Service Account type.