


Application Configuration in Salesforce Portal for OAuth2 Account to use in Salesforce
Overview
Snaps in the Salesforce Snap Pack use the Salesforce OAuth2 account to access the Salesforce application. For the OAuth2 account to function without any issue, ensure to create and configure a Connected App corresponding to the account as explained in the steps below. These steps also contain the information required to create/define a new OAuth2 account for using this Snap Pack.
Create a Connected app in Salesforce Portal
Log into the Salesforce portal.
Click the Setup icon on the top-right of the page and select Setup.
Navigate to PLATFORM TOOLS > Apps > App Manager.
Click New Connected App.
-
Enter the following required basic information to help identify your app in the Salesforce dashboard.
Connected App Name: Enter a unique name for the app.
API Name: The API name is automatically populated.
Contact Email: Enter your email ID.
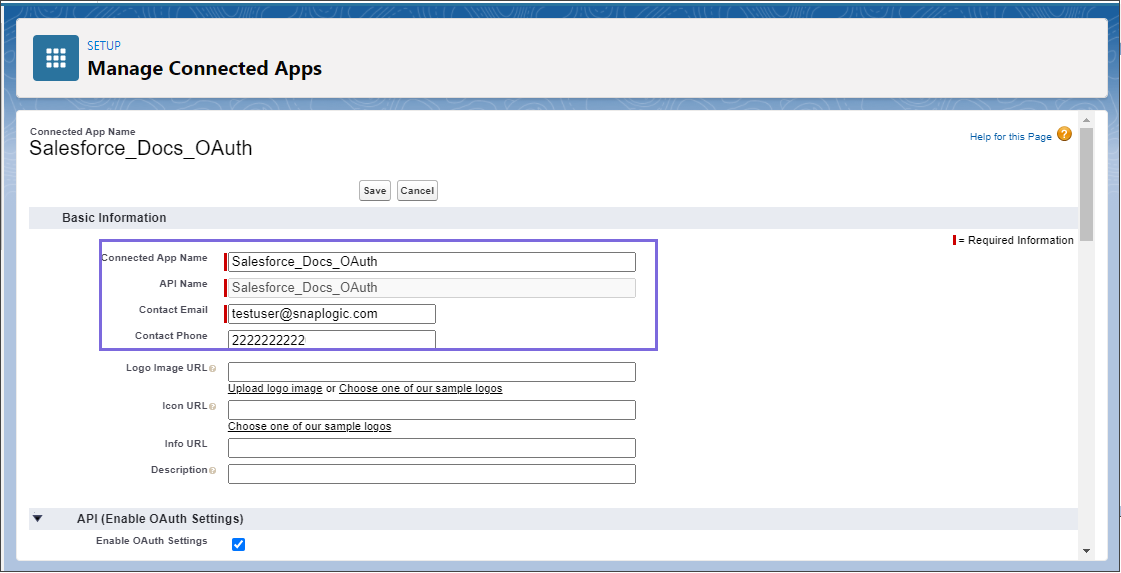
-
Select the Enable OAuth Settings checkbox under API (Enable OAuth Settings).
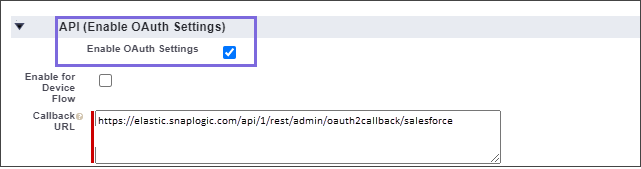
-
Enter the required Redirect or Callback URL (to which the response should be sent) in the Callback URL box. Based on the region your server is located, provide the URL in the following format:
https://<control-plane-name>.snaplogic.com/api/1/rest/admin/oauth2callback/<snap-pack-name>where the<control-plane-name>corresponds to the domain part of your SnapLogic URL—elastic (global control plane) or emea (EMEA control plane). For example,https://emea.snaplogic.com/api/1/rest/admin/oauth2callback/salesforceorhttps://elastic.snaplogic.com/api/1/rest/admin/oauth2callback/salesforce. After successful authentication, Salesforce redirects to this Callback URL. -
Select the required OAuth Scopes. Scope determines the level of access that you want to provide to your application. You must subscribe to
refresh_tokenandoffline_accessscopes.Note: If you face any issues in authorizing the Salesforce OAuth2 Account, make sure that you deselect the Require Proof Key for Code Exchange (PKCE) Extension for Supported Authorization Flows checkbox in your registered application in Salesforce and retry.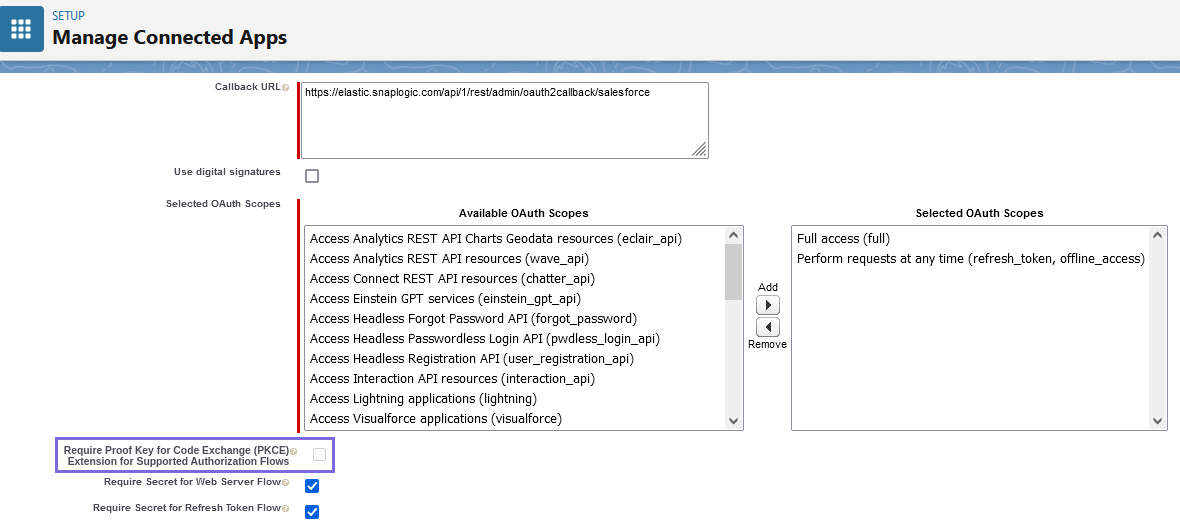
Click Save and wait for a few minutes for the app to work.
After configuring the Connected App, you will receive the Client ID and Client Secret.
Open the App you created and note the Client ID and Client Secret.
It might take up to 10 minutes for the changes to take effect for the new or updated app — you cannot work on it immediately.
Deleting a parent org also deletes all connected apps with OAuth settings enabled.
When providing the Callback URL during your configuration, if you are working with Salesforce Snaps, then adding Callback URL for Salesforce should be sufficient. However, if you are working with REST Snaps besides Salesforce, then you must add a Callback URL for REST as well.
Locate/Define Information Required to Create your Salesforce OAuth2 Account
Specify the values required to create a successful Salesforce OAuth2 account.
-
Navigate to the Salesforce Snap of your choice and set up the Salesforce OAuth2 Account with the following details:
Client ID: A Public Identifier for your app.
Client Secret: Secret value known only to the app and the auth server.
-
OAuth2 Endpoint:
For the production environment: https://login.salesforce.com/services/oauth2/authorize
For sandbox: https://test.salesforce.com/services/oauth2/authorize
-
OAuth2 Token:
For the production environment: https://login.salesforce.com/services/oauth2/token
For sandbox: https://test.salesforce.com/services/oauth2/token
-
Token Endpoint Configuration (these fields are optional):
Token endpoint parameter: For example,
redirect_uriToken endpoint parameter value: <https://elastic.snaplogic.com/api/1/rest/admin/oauth>
-
Auth Endpoint configuration (these fields are optional):
Authentication parameter: For example,
redirect_uriAuthentication parameter value: <https://elastic.snaplogic.com/api/1/rest/admin/oauth>
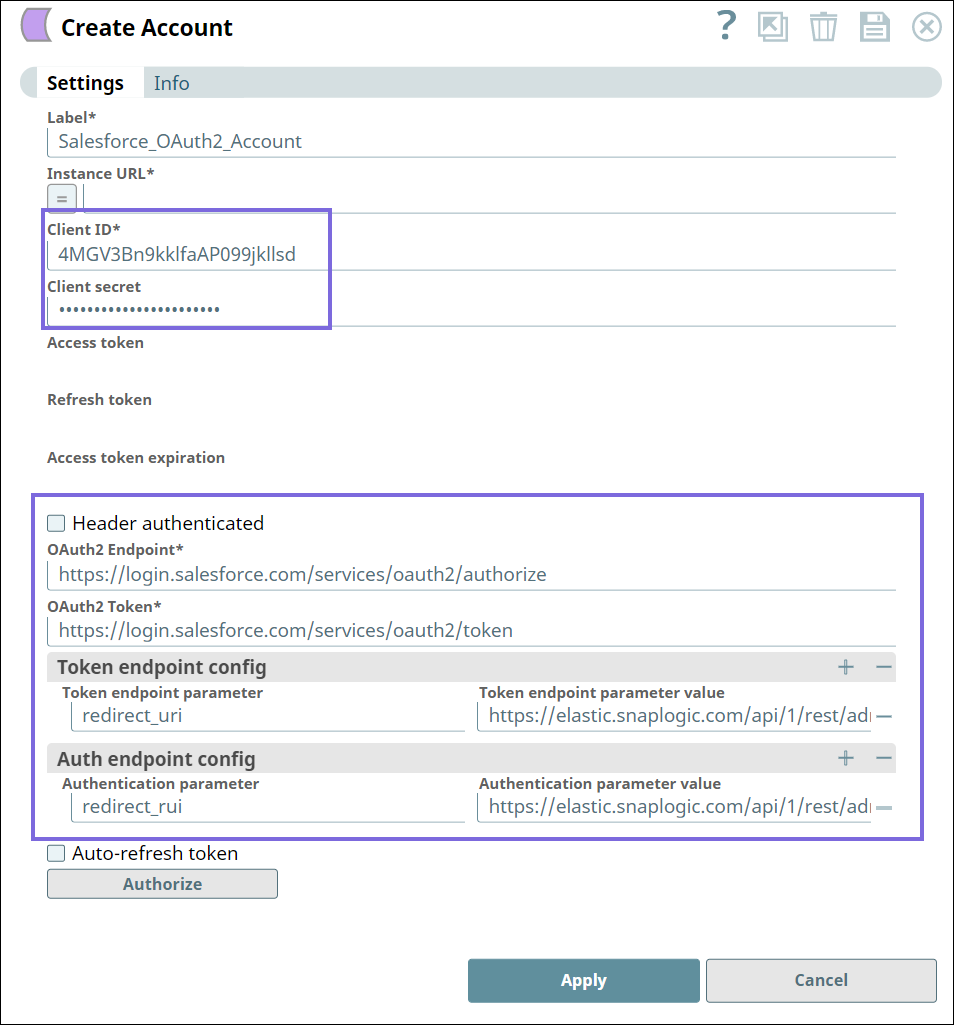
Click Authorize. You will be redirected to the login page of Salesforce. If you provide any new scopes, then click on Install App.
Log into Salesforce and accept the permissions. The Access token and the Refresh Token will be generated.
Select the Auto-refresh token checkbox and save the account.
Related Links